
Overview
Deploying and managing Mule applications efficiently is a key aspect of any integration project. While Mule Standalone Runtime provides a way to run applications locally or on-prem, it often falls short when it comes to visibility, scalability, and ease of management. That’s where Anypoint Runtime Manager comes into play.
In this article, we’ll explore how to deploy Mule applications using Runtime Manager, MuleSoft’s centralized, web-based platform that simplifies the deployment process across environments—whether in the cloud, on-premises, or hybrid. We’ll walk through the setup, explain how the Mule Agent communicates with Runtime Manager, and highlight the benefits of using this approach over manual deployments.
We highly recommend checking out our previous article where we explained how to configure and deploy a Mule application to the Mule Standalone Runtime, and how to package the Mule application as a JAR file. This article is a continuation of that guide, focusing on deploying Mule applications using Runtime Manager.
Architecture of Runtime Manger with Standalone runtime

In a hybrid deployment setup using MuleSoft, the architecture typically involves the following components:
- Mule Runtime Manager (Cloud)
- This is a web-based console provided by MuleSoft through the Anypoint Platform.
- It allows you to manage, monitor, deploy, stop, restart, and delete applications running on Mule runtimes—even if they are hosted on-premise.
- hink of it as the control tower for all your Mule runtimes.
- Mule Standalone Runtime (On-Premise)
- This is the runtime engine where your Mule applications physically run.
- It can be hosted on-premise or in any infrastructure you control (e.g., VM, cloud VM, Docker container, etc.).
- Mule Agent
- Mule Agent is a lightweight Java module installed within the Mule Standalone Runtime.
- It acts as a bridge between the Mule Runtime Manager (cloud) and the on-premise Mule Standalone Runtime.
- The agent exposes hooks to perform actions like application deployment, undeployment, log streaming, metrics, and more.
- WebSocket Communication
- The communication between Mule Agent and Runtime Manager is established over a WebSocket connection.
- This persistent, bi-directional connection ensures real-time command and data exchange.
- Through this channel, Runtime Manager sends deployment instructions, and the Agent responds with health, logs, and metrics.
✅ Benefits of This Architecture
- You don’t need to SSH into your servers to deploy or manage applications.
- Gives you centralized visibility and control over all runtimes (on-prem or cloud).
- Supports seamless DevOps and CI/CD integration via APIs and automation scripts.
Create Account in Anypoint Platform
MuleSoft’s Runtime Manager is a web-based application available through the Anypoint Platform. To start using it, you’ll first need to create an account on the Anypoint Platform. You can click here to sign up and log in.
Deploy Mule Application to Mule standalone runtime using Runtime Manager
Once you’ve successfully logged in to the Anypoint Platform, click on the menu icon (☰) in the top-left corner. Under the “Runtimes” section, select Runtime Manager. From there, follow the steps below to deploy your Mule application.
We’ll be following a clean deployment approach in this article. So, if you have previously deployed a Mule application manually by following our earlier guide, please remove it by deleting the
yourappname-anchor file from the apps directory in your Mule Standalone Runtime.- When you access Runtime Manager for the first time, you’ll be prompted to select an environment. For this guide, we’ll choose the Sandbox environment. However, if you have multiple environments set up (such as Dev, QA, or Prod), feel free to select the one that suits your use case.
- Click on “Add Server” in Runtime Manager to register your local Mule Standalone Runtime. Provide a meaningful name for the server, then copy the command displayed on the screen — you’ll need to run this on your local machine to complete the registration.
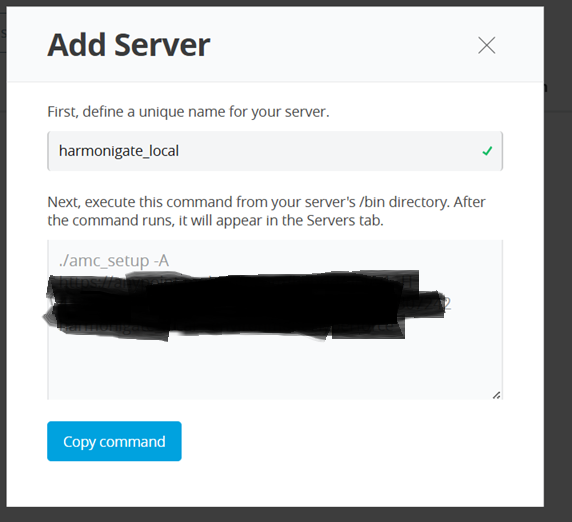
- Open the Command Prompt directly in the
bindirectory of your Mule Standalone Runtime installation. Then, run the command copied from Runtime Manager. If you’re on a Windows system, be sure to remove the ‘./'prefix from the command before executing it.
Explanation :
- If you observe the command, it uses the
amc_setup.batfile, which stands for Anypoint Management Center setup. Once the
amc_setupscript is executed, the Mule Agent is installed and initiates communication with the Anypoint Management Center (AMC) running in the cloud. This process registers the local Mule server with Runtime Manager, enabling centralized management from the Anypoint Platform.
- If you observe the command, it uses the
- Once the registration command is executed successfully, you’ll see the server listed in Runtime Manager with the status marked as “Created”. However, at this stage, the server is not yet running.
- To start the Mule runtime, return to the command prompt where you registered the server and run the
mulecommand. After executing it, refresh the Runtime Manager page—you should now see the server status updated to “Connected”. - In the left-hand navigation panel, click on Applications (located above the Servers section).
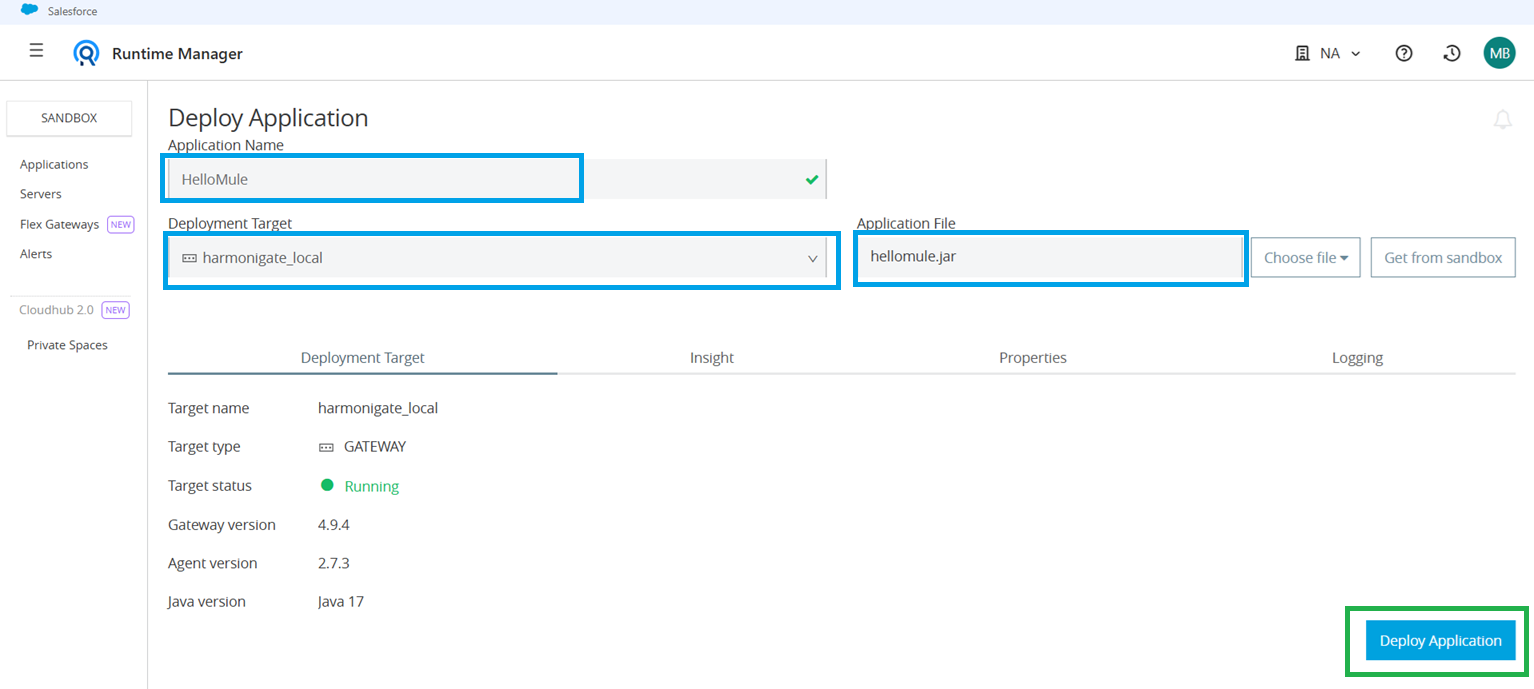
- Click the Deploy Application button.
- Enter a unique name for your application.
- Under Deployment Target, choose the registered server listed under the Hybrid section.
- In the Application File field, upload the JAR file you created in the previous article by exporting Mule project.
- Finally, click the Deploy Application button to initiate the deployment.
- Once the deployment is complete, you’ll notice that an anchor file is created locally inside the
appsfolder. - If you want to delete or restart the deployed application, go to the Settings page of the application. You’ll find these options in the top-right section of the page.
Once the application has been successfully deployed, you can test it by sending a request from Postman. You should receive a successful response from your running Mule application.
Deploy Mule Application to CloudHub using Runtime Manager
CloudHub is MuleSoft’s fully managed, cloud-based integration platform as a service (iPaaS), designed to run and scale Mule applications without the need to manage infrastructure. Using Anypoint Runtime Manager, you can easily deploy your Mule applications to CloudHub with just a few clicks, directly from the web interface.
In this section, we’ll walk through the steps to deploy a Mule application to CloudHub using Runtime Manager. You’ll learn how to choose deployment regions, configure worker settings, upload your packaged application (JAR file), and monitor your app once it’s running in the cloud.
This approach eliminates the complexity of on-prem setup, offering automatic scalability, built-in monitoring, and high availability—making it ideal for cloud-native integration use cases.
- Navigate to Runtime Manager in the Anypoint Platform.
- Click on Applications, then click the “Deploy Application” button.
- Enter a name for your Mule application.
Under Deployment Target, select Shared Space in CloudHub 2.0.
⚠️ Important Note:
CloudHub 2.0 is MuleSoft’s modern, container-based cloud deployment platform that runs Mule applications in a multi-tenant environment. Each application is deployed as an isolated container, offering improved performance, scalability, and faster startup times.For more info, please do checkout the official documentation. - In the Application File section, upload the exported JAR file of your Mule application.
- In the Runtime tab, you’ll notice a Replicas section. Here, you can configure the number of application instances (replicas) and their size. This setting should be adjusted based on the expected load on your application.Since this is a demo project, you can leave the default values as they are.
- Finally, click “Deploy Application” to deploy your app to CloudHub 2.0.
Once your application is successfully deployed to CloudHub, navigate into the application details in Runtime Manager. There, you’ll find the public endpoint URL—this is a load-balanced URL, meaning if you’ve configured multiple replicas (workers), the traffic will automatically be distributed across them.
Now that your app is running in the cloud, you can replace localhost and the local port in your API request with this public URL. Just ensure that the resource path and base path are correctly appended. You can then invoke the service using Postman, and you should receive the expected response from your Mule application deployed on CloudHub.
✨ Hope you found this article informative!
If it helped you, share it with your friends or team — let’s spread the knowledge. 🙌
Cheers! 🚀
Very interesting topic, thankyou for putting up.
Hi, I do think this is a great blog. I stumbledupon it 😉 I will revisit yet again since i have book
marked it. Money and freedom is the best way to change, may you
be rich and continue to guide others.