
In the modern digital age, quick and reliable communication during critical moments is essential. That’s where Twilio comes in. It’s a top-notch platform that lets us send important alerts through phone calls or texts, ensuring timely notifications when they matter most. This article takes a closer look at Twilio’s role, showing how it’s changing the game for urgent communication in our interconnected world.
Before we get into the details, let’s explore how Twilio can benefit our business and how we can use it effectively.
Twilio stands out as a versatile communication platform for businesses. It offers a comprehensive set of tools that go beyond mere emails and texts – you can seamlessly make calls, develop video call applications, and more. The real beauty lies in Twilio’s dedicated APIs, simplifying the intricate technicalities and enabling your business to craft sophisticated communication solutions effortlessly.
Let’s see how Twilio can be seamlessly integrated with webMethods to save us precious time. Imagine a scenario in our production setup where different connections, like MQ, UM, and JDBC, might go offline. This could impact our business operations. With Twilio, we can set up a smart solution. We’ll create jobs that keep an eye on these connections. If any of them falters, Twilio’s phone call API kicks in and alerts our operations team instantly. This way, they can swiftly tackle the issue, minimizing downtime and keeping our business on track.
Twilio Account Setup :
- Open your web browser and visit “https://www.twilio.com/en-us”. Click on the “Sign up for free” button.

- Enter your information, including your email and password, then click the “Start your free trial” button.
- After signing up, you’ll receive an email to verify your account. Make sure to check your email and complete the verification process.
- Once your account verification is done, you’ll receive a $15 credit in your free account. This credit can be used during your trial period.
- Next, you’ll be prompted to verify your phone number. Just enter your phone number, click “Send Verification Code,” and follow the instructions to verify your phone number.Note : In the free Twilio account, you can only call numbers that are verified in your Twilio dashboard. The phone number you just verified will be used as the recipient (To) in the phone call API.
- Next, Twilio will request some information about the products you intend to use in your account. Once you’ve provided the details, simply click the “Get Started with Twilio” button.

- Twilio will now ask you to purchase a phone number that it will use to make calls. You can use your free credit to buy this phone number.

- When you receive the phone number, you’ll also see the SID and Auth Token displayed. Keep these safe as you’ll need them when making calls using the Twilio API (You can also get these details from “API Key and Auth Token” under Account section).
- Now, let’s define what message you want to convey to the recipient during the call. Twilio uses something called TwiML format for this purpose. It’s like a set of instructions that you use to tell Twilio what to say in the call.
- You have two options for hosting your TwiML XML file. You can either use your own hosting provider and provide the URL in the API call, or you can use Twilio’s Bin feature to host the TwiML file and then give the URL in the API call. For now, let’s create a TwiML in TwilML Bin.
- Visit “https://www.twilio.com/docs/serverless/twiml-bins” and click on “Create your first TwiML Bin”.

- Now, name your TwiML bin and write the message you want to share during the call. You can even choose the voice, whether it’s a male or female voice. For more details, you can refer to Twilio’s official documentation.
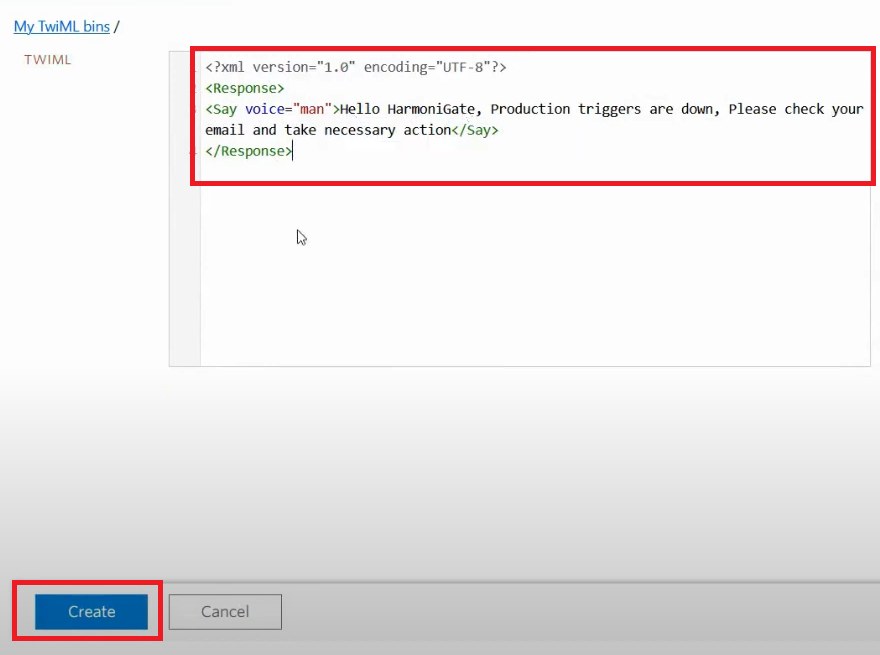
- After creating the Bin, make sure to note down the TwiML SID and the URL. You’ll use the URL to call the voice API, and the SID can be used to update the message through the API later on.

- Now Twilio account setup is completed.


Twilio Integration With WebMethods Flow service :
- Create a package named “TwilioDemo” and organize it with the following structure.

- Inside services folder create a flow service with name “makePhoneCallUsingTwilio”.
- In the flow service, invoke “pub.client:http” to call the Twilio API. This service handles the HTTP communication for us.

- Now update the placeholder in the URL with your actual Twilio SID, and then input the updated URL directly into the URL service parameter.
Url – “https://api.twilio.com/2010-04-01/Accounts/SID/Calls.json”
- Hardcode method as post.

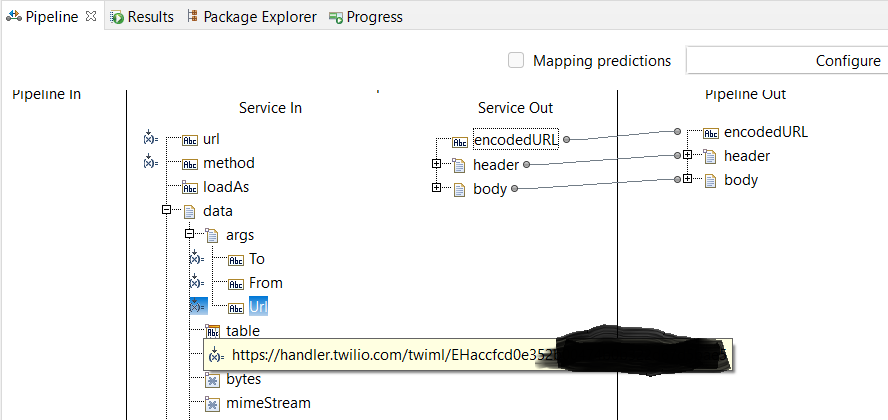
- Under “data” → “args” document, create a string variable named “To”, Enter the mobile number to which you want the call to be made. Remember to verify this number in your Twilio dashboard for the free account.

- In the “data” → “args” document, add a new variable called “From” Input the phone number you purchased in your Twilio account as a hardcoded value for this variable.

- Within the “data” → “args” document, include an additional variable named “Url.” Insert the TwiML bin URL where you’ve set up the message to be spoken during the call.
- Now hard code the type variable under auth document with “Basic”.

- Enter your Twilio SID as the value for the “user” variable within the “auth” document, and use your Twilio token as the password.

- In the “header” section, create a string variable named “Content-Type,” and assign it the value “application/x-www-form-urlencoded”.

- We’re done with the coding! Let’s run it and see the results in action!
- Congratulations we have successfully integrated Twilio!!!!


Hope you have enjoyed this article, click below download button to download the source code😊.
