Need of CLOB and BLOB data types :
- CLOB and BLOB data types are available in SQL which allows us to store large pieces of text (like long XML, JSON) and binary data (like images, videos, or files) because regular text and binary data types can’t handle such large amounts of information.
- It helps us to store large data in a database and retrieve large text and binary data efficiently.
BLOB Data Type :
- BLOB data types in SQL stands for Binary Large Object and it helps us to store large binary data such as images, audio files, video files, or any other binary data.
- The BLOB data type is designed to store extensive binary data where we don’t need to specify the size of BLOB while creating the table and it can store up to gigabytes in size.
- BLOB stores and retrieves the binary data from the table, and we can insert, update, and select binary data using BLOB columns.
CLOB Data Type :
- CLOB data types in SQL stands for Character Large Object and it helps us to store large character data such as plain text, XML documents, JSON data, or any other character-based data.
- CLOB data type is designed to store large binary data where we don’t need to specify the size of CLOB while creating the table and it can store up to gigabytes in size.
- We can perform various text operations on CLOB data, such as searching, substring extraction, and concatenation.
Prerequisite for this Exercise:
- You should have an Oracle Database installed.
- Active Oracle JDBC Connection, please click here to check out our article on JDBC connection setup.
- Basic knowledge of creating JDBC Adapter, click here to check out our article on JDBC adapter implementation.
- Basic knowledge of SQL.
CLOB Data Types implementation in WebMethods :
For CLOB data type implementation we will be storing large XML in the table and retrieving it using it’s id, follow below steps mentioned below to implement it in webMethods.
- Run the below SQL query in your Oracle database to create a table in your Oracle database.
CREATE TABLE XMLPayloads ( Payload_ID VARCHAR2(50) PRIMARY KEY, XML_Payload CLOB ); - Create a package with the name ‘HG_Clob_Blob_Demo’ and below folder structure.
- Right-click on the adapters folder and create a JDBC adapter with the name ‘insertXMLPayload’ using the InsertSQL adapter template and your Oracle connection.
- Once the Insert adapter is created select the ‘XMLPayloads’ under the current schema in the Table tab.
- In the INSERT tab add the columns that you want to insert into the table and make the XML_Payload input field to ‘java.io.Reader‘.
- As we have selected the input field type as java.io.Reader we need to convert our XML string to the reader format and pass it to the adapter service and webmethods will typecast it to ‘java.sql.clob‘ type, for the typecasting our Oracle jar should have necessary classes that webmethods can use to perform typecasting, if we have the latest version of the Oracle jar then it should have the typecasting classes else download ‘oracleTypesImp.jar’ and put it into the below path and restart your integration server.
jar path: ‘C:SoftwareAGIntegrationServerinstancesdefaultpackagesWmJDBCAdaptercodejars’ - We can pass our data in any of the below formats :
- java.sql.clob : You need to write your own java service to convert the string to ‘java.sql.clob‘ format and use the same to insert it into the database.
- java.lang.String : We can also pass the string data to the adapter for insertion but it is recommended if you have small data in the string variable else if you have large data then you may get the memory out-of-bounds exception.
- java.io.Reader : It is recommended if you have large data then first convert it to Reader format and then use the same to call the adapter.
- java.lang.Object : We can also convert the string value to an object and use this to store it in the table.
- In the Result tab set the Result Field to ‘count’ and Result Field Type to ‘java.lang.String’ which will allow us to get the count of records inserted into the table.
- Create a flow service in the services folder with the name ‘insertPayloadIntoTable’, in this service we will call the adapter service to insert the data into the table.
- Create an input variable with the name ‘inputXML’ in the input section of the flow service and in the output, create a variable with the name ‘insertedRows’, which will allow us to store the count value returned from the adapter service.
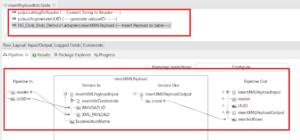
- Invoke ‘pub.io:stringToReader’ into your flow service to convert the string to Reader format and follow the below mapping.
- Invoke ‘pub.utils:generateUUID’ service to generate a unique ID which we can store in the table to uniquely retrieve value from the table.
- Invoke ‘insertXMLPayload’ adapter service and follow the below mapping to insert data into the table.
- Now we have complete development to store the data in the table so let’s run the flow service with the below XML to verify if we are able to store XML into the table.
<?xml version="1.0"?> <Employee> <EmployeeDetails> <Name>John Doe</Name> <Age>23</Age> <Designation>Junior Engineer</Designation> <Salary>10000</Salary> </EmployeeDetails> <EmployeeDetails> <Name>Price Alex</Name> <Age>25</Age> <Designation>Software Engineer</Designation> <Salary>15000</Salary> </EmployeeDetails> <EmployeeDetails> <Name>Jos Buttler</Name> <Age>23</Age> <Designation>Junior Engineer</Designation> <Salary>15000</Salary> </EmployeeDetails> </Employee> - Once you run the service with the above data you will get the ‘insertedRows’ as ‘1’, so let’s verify in the table as well.
- Congratulations!! we have successfully stored our clob data in the table.
- Now we have created and verified our clob data insertion service so let’s create the flow service to retrieve the clob data from the database table.
- Create a JDBC adapter service with the name ‘selectXMLPayload’ in the adapters folder using the Oracle JDBC connection and the SelectSQL template.
- In the Table tab select the ‘XMLPayloads’ under the current schema as we did in the previous insert adapter.
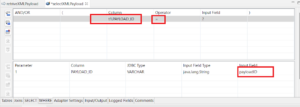
- In the SELECT tab add both columns and set the ‘XML_Payload’ output type to ‘java.io.Reader’.
- In the WHERE tab define the condition to select payload using ‘Payload_ID’.
- Create a flow service with the name ‘retriveXMLPayload’ and define the input variable with the name ‘payload_ID’ and the output variable with the name ‘payloadXML’.
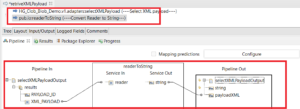
- Invoke ‘selectXMLPayload’ adapter service and perform the below mapping.
- Invoke ‘pub.io:readerToString’ to convert our payload to string and perform the below mapping.
- Now we are done with the dev work so collect the payload_Id from ‘XMLPayloads’ and run our flow service with payload_id as ‘payload_ID’.
- Congratulations !! we have successfully completed the CLOB data type implementation in webmethods.
BLOB Data Types implementation in WebMethods :
As part of BLOB Data type implementation, we will store the image in the table as a BLOB object and retrieve it and store it as an image with .jpg format.
- Copy and execute below SQL query in your Oracle database to create a table to store images as blob data.
CREATE TABLE ImageGallery ( Image_ID VARCHAR2(50) PRIMARY KEY, Image BLOB, Image_Name VARCHAR2(20) ); - Right-click on the adapters folder and create a JDBC adapter service with the name ‘insertImage’ using the InsertSQL adapter template and your Oracle connection.
- In the Table tab select the ‘ImageGallery’ table under the current schema.
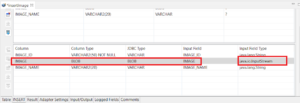
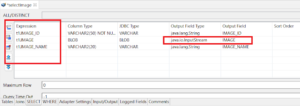
- In the SELECT tab add the column names and set the ‘Image’ input field type from ‘java.sql.blob’ to ‘java.io.inputStream’ which is recommended for large files and you can explore other options as well.
- In the Result tab set the Result Field to ‘count’ and Result Field Type to ‘java.lang.String’.
- In the Services folder create a flow service with the name ‘insertImageToDatabase’.
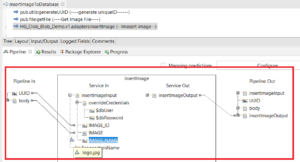
- Invoke ‘pub.utils:generateUUID’ service in ‘insertImageToDatabase’ flow service to generate a unique ID.
- Invoke ‘pub.file:getFile’ and set parameters with the below value.
- filename : D:SharedDirectoryInboundlogo.jpg (your image full path).
- loadAs : stream
- Invoke ‘insertImage’ adapter service and perform the below mapping.
- Now run the flow service to verify whether it is storing data in the table or not.
- Congratulations!! we did it.
- As of now, we have completed the first part to insert the image so let’s create an adapter service with the name ‘selectImage’ in the adapters folder using Oracle JDBC connection and the selectSQL template.
- In the Table tab select the table name under the current schema and in the SELECT tab define all the columns that you want to retrieve and set the ‘image’ field to ‘java.io.inputStream’.
- In the WHERE tab define the ‘Image_ID’ column to select data based on the Image_ID.
- Create a flow service in the services folder with the name ‘retriveImage’.
- Create one input field with the name ‘image_Id’ in the service input section.
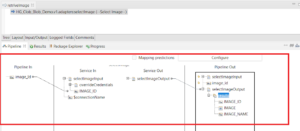
- Invoke the ‘selectImage’ adapter service and perform the below mapping.
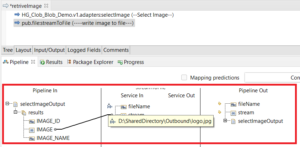
- Invoke ‘pub.file:streamToFile’ which will allow us to write a stream object to an image file.
- Now collect the image_id from the database and run the service to verify if we are able to get the image from the database.
- Congratulations!! we did it😊.










Wow! At last I got a weblog from where I be able to actually get valuable data concerning mmy
study and knowledge.
Awesome! Its truly awesome paragraph, I have got much clear
idea about from this paragraph.