
Overview
In today’s world of fast-paced digital transformation, businesses rely on a vast network of applications, data sources, and systems. Making them all talk to each other seamlessly is no small feat. That’s where Mulesoft comes in.
Whether you’re an integration enthusiast, an enterprise architect, or someone curious about the buzz around API-led connectivity, this post is for you.
What is Mulesoft?
Mulesoft is a platform that helps businesses connect applications, data, and devices—whether on-premises or in the cloud—through APIs (Application Programming Interfaces).
At its core, Mule is a lightweight, Java-based Enterprise Service Bus (ESB) and integration framework. It’s designed to transport data between systems—much like a mule carries loads.
Mulesoft was acquired by Salesforce in 2018, and since then, it has become a cornerstone for digital transformation strategies focused on API-first development.
Why do we need Mulesoft?
Here’s the thing: as businesses grow, they use more and more applications—some on the cloud, others still on local servers. Integrating all these apps securely, efficiently, and scalably becomes a real challenge.
Here’s why Mulesoft is needed:
- ✅ System Integration: Connects legacy systems, databases, SaaS platforms, and more.
- 🔁 Reusability: Build APIs once, reuse them across multiple projects.
- 🔒 Security: Built-in policies for authentication, encryption, and access control.
- ⚡ Speed: Faster time-to-market through reusable connectors and templates.
- 🔍 Visibility: Monitor API usage, track performance, and troubleshoot easily.
Setup Anypoint Studio :
The process of creating a Mule integration in Anypoint Studio begins with downloading and configuring the necessary software. Navigate to the Anypoint Studio download page by clicking here and then proceed with the setup by following the instructions outlined below.
- Once you land on the download page, select the product as “Anypoint Studio and Mule”, choose the latest version, and select your operating system.
- Next, fill in your personal details such as your email address, phone number, and other required information.
- After entering all the necessary details, click on the Download button.
- You will receive an email with the download link—use that link to download Anypoint Studio.
Once Anypoint Studio is downloaded, you’ll notice that it’s a portable ZIP file without an installer. Simply unzip it. Open the unzipped folder and get into the AnypointStudio folder, you will see AnypointStudio application just open it,and you’re ready to start integration development.
Once you open the application, you’ll see the Welcome page. Go ahead and close it.Anypoint Studio comes with an embedded JDK, which you can view by navigating to:
Window → Preferences → Installed JREs.
To add your own JDK:
- Click the Add button on the right-hand side of the screen.
- Select Standard VM.
Fill in the JDK details.
Note: The JRE home directory should not point to the bin folder. Instead, select the directory above it.
Example: C:/Program Files/Java/jdk-version
Create your first Project in Mulesoft :
As part of this project, we will create a sample API in Anypoint Studio. Please note that this article will also walk you through the project structure and its usage.
- Inside Anypoint Studio, go to File → New → Mule Project.
- Give your project a name — for this article, we’ll name it “HelloMule”.
- You’ll see that a runtime is already selected by default. If you’d like to choose a different runtime, click on the “Install Runtimes” option and select the desired version.
- Once everything is set, click the Finish button to create the project.
Project Structure :
Once project is created , you will see the structure like below, now we will take a look into the important sections and it’s usage.
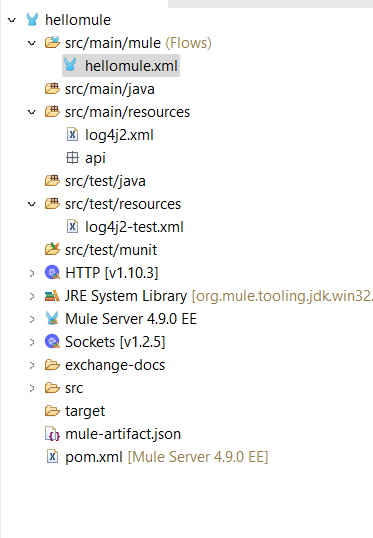
- 📂
src/main/mule— Your Flow’s Home
This is the main directory where all your Mule configuration files (also called flows) live. These files are typically in XML format and define how your API or integration behaves.
- 📂
src/main/java— For Custom Java Code
In a Mulesoft project, the
**src/main/java**folder is where you write custom Java classes that extend the capabilities of your Mule flows.Mulesoft provides a wide range of out-of-the-box processors, connectors, and components, but sometimes you might need logic that isn’t available out of the box. That’s when you create your own Java classes—and this is the folder where they belong.
- 📂
src/main/resources— For Configuration and Static Resources
This folder is used to store all the non-code resources that your Mule application needs during runtime. These could be configuration files, property files, static data files, or anything your flows or Java classes might need.
- 📂
src/test/java— For Writing Unit Tests
This folder is where you place Java-based test cases for your Mule application. It follows the standard Maven project structure, keeping your tests separate from your actual business logic.
📂src/test/resources— Test Configuration and Test Data
This folder is used to store resource files that are specifically needed during testing. These can include property files, test-specific configurations, mock data files, or anything that supports your unit or integration tests.
- 📂
src/test/munit— MUnit Test Cases for Mule Flows
This folder is specifically used to store MUnit test cases, which are XML-based test files created to test your Mule flows. MUnit is Mulesoft’s built-in testing framework, similar to JUnit for Java.
- 📂
exchange-docs— Documentation for Anypoint Exchange
The**exchange-docs**folder is used to store documentation files that describe your Mulesoft API, connector, or asset when it is published to Anypoint Exchange.
- 📄
mule-artifact.json— Mule Application Metadata
This file contains important metadata about your Mule application. It’s automatically generated when you create or build your Mule project.
- 📄
pom.xml— Project Object Model
pom.xmlis basically the blueprint and control center for your Mule project’s build process. It tells Maven how to build, package, and manage your project.- What does it do?
- Defines project info: name, version, description.
- Manages dependencies: lists libraries (like Mule runtime, connectors, Java libs) your project needs.
- Specifies build plugins: tools that compile, package, run tests, etc.
- Controls build lifecycle: phases like clean, compile, test, package, deploy.
- Handles project modules: if your project has multiple parts.
- Why is it important?
- Makes builds repeatable and consistent across environments.
- Automatically downloads required libraries, so you don’t have to manage jars manually.
Allows easy project configuration and customization.
- What does it do?
Build Code :
We will create a sample API and consume it using postman, please note will will not perform error handing and other customization with respect to response and status code as we will have a separate article on the same.
- Open the hellomule.xml and navigate to ‘MessageFlow’ section.
- Drag Listener from http module available in ‘Mule Palette’ into the canvas.
- Click on the Listener icon and in the properties section, you will find the editor to configure the listener.
- Display name – give the name as ‘Http Listener’.
- Connector Configuration – Click on the pus icon and configure like below which will be used to expose the API.
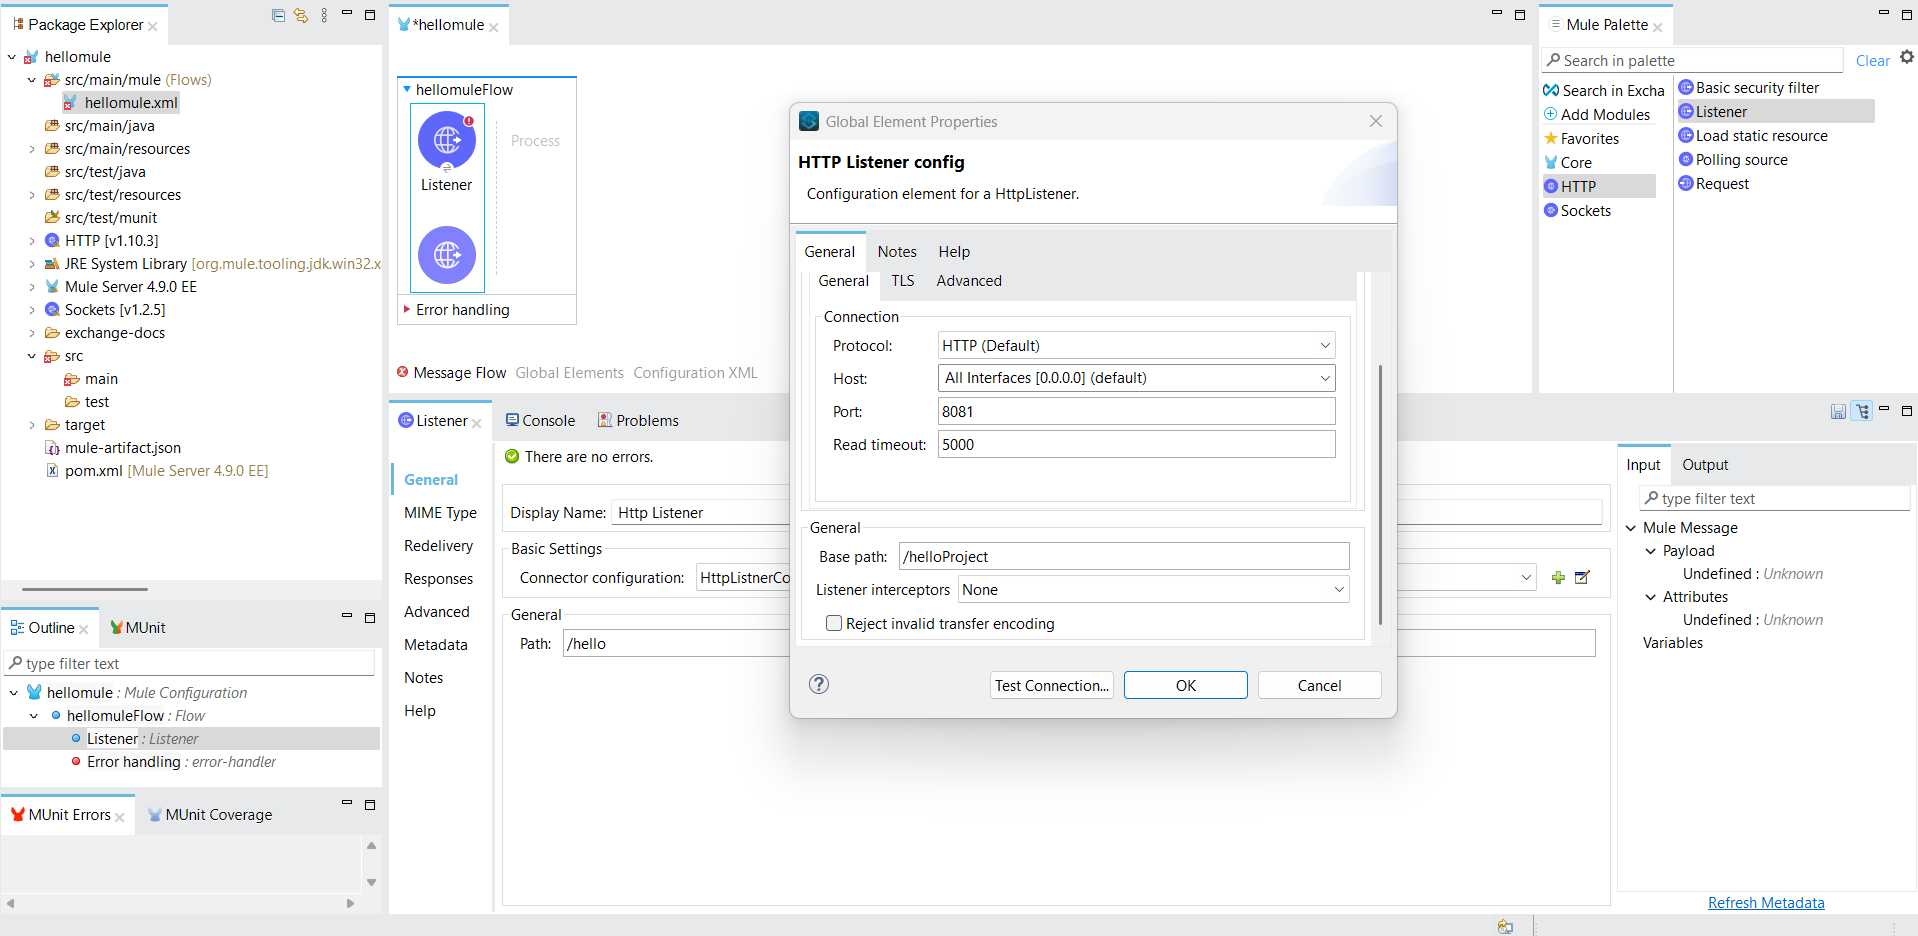
- From the above screenshot, you can see it contains the API information such as host and port details. It also includes the base path, which you can consider as the API name. This base path is optional, so you may choose to ignore it. Once everything is set, you can test the connection to verify if the port is available. If the port is unavailable, please provide another available port and test the connection again.
- In path section put /hello which will be the resource for our API.
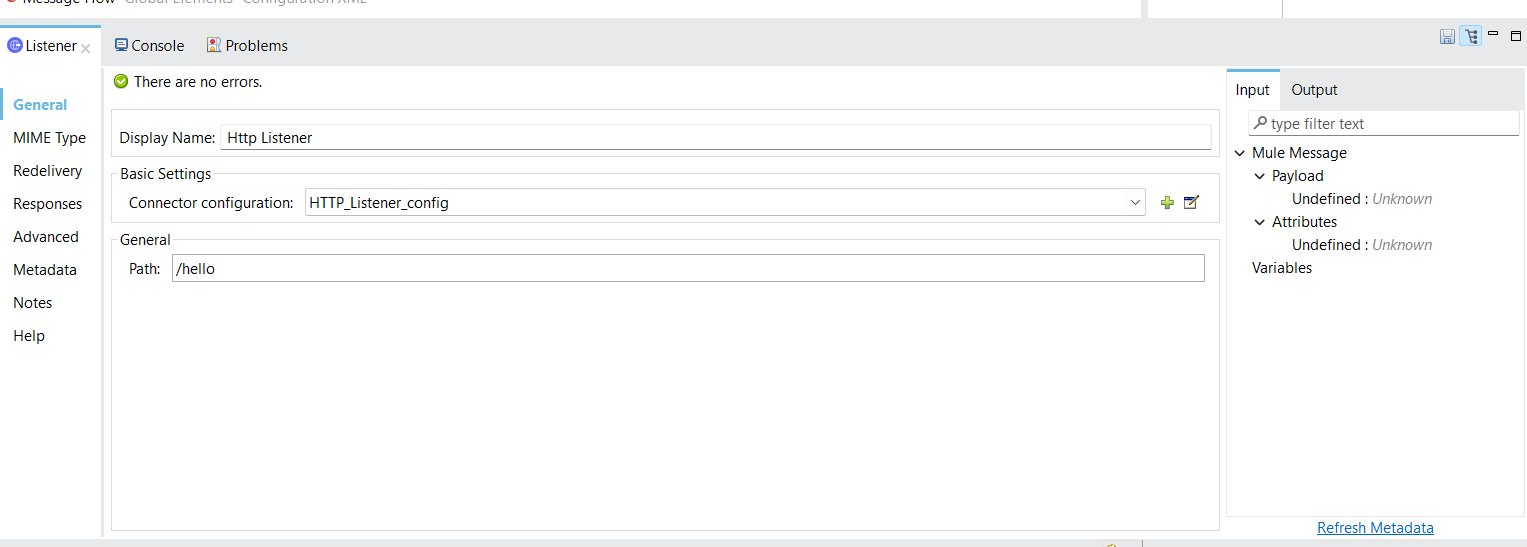
- Navigate to MIME Type section and select MIME Type as text/plain.
- You can explore other section as well, we will create a proper API in the next article where we will go through every section properly and use it efficiently.
- Now drag the ‘Set Payload’ connection from core module and drop it into the canvas, we will use it to send the payload to the API consumer, look into the below screenshot and configure it accordingly.
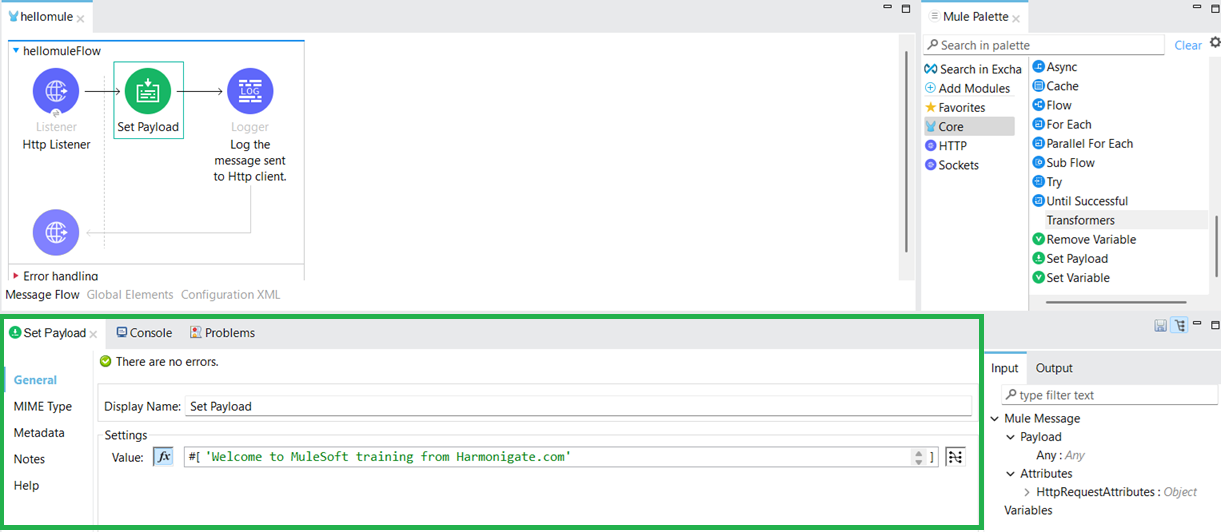
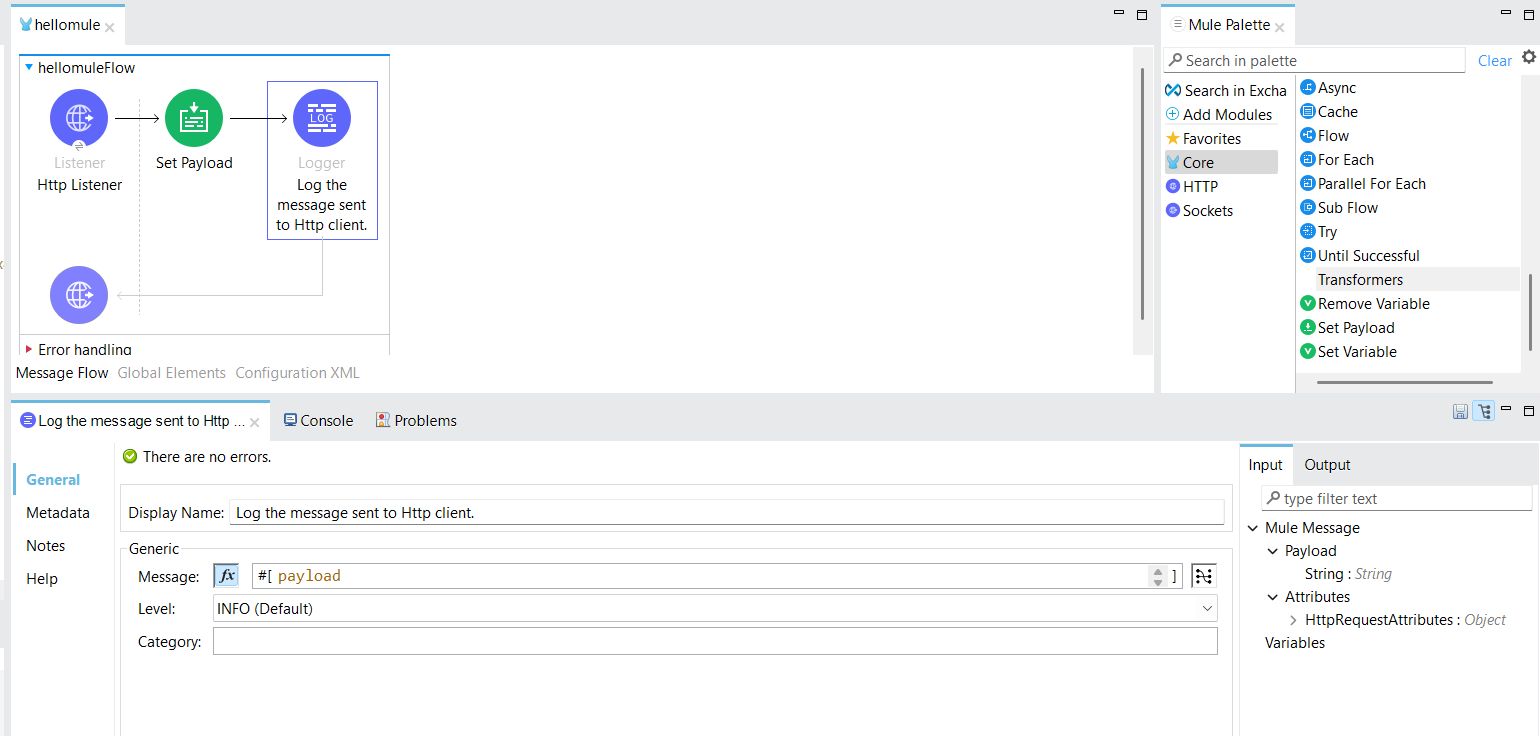
You might be wondering how the payload variable is sent to the API consumer. If you look at the responses section of the Listener connector, you’ll see it’s configured to send the payload as body. This means whatever data is in the payload will be sent to the consumer. - Now drag Logger connector and configure it as shown in below screenshot to log the payload.
Test API :
As we have completed the development, it’s time to test the API. Right-click on the canvas and select Run Project. Once you click the run button in the canvas section, you will notice that the project is being built and deployed to the Mule runtime by Maven.
Open the Postman application and send a request to the URL http://localhost:8081/helloProject/hello to invoke the API. You can see that the API URL consists of the base path followed by the resource name to access the deployed API.

Once you invoke the API via Postman, you can see the response returned in the body section. Also, since we used a logger in our Mule application, open Anypoint Studio and check the console—you will see the logged message there as well.
Bonus Point :
In real-world projects, as the number of flows increases, managing configurations within a single XML file—where your actual implementation code also exists—can become cumbersome. Mixing configurations with flow logic can make the file cluttered and harder to maintain. To keep things organized, it’s a best practice to move your global configurations to a separate Mule configuration file. This allows for better separation of concerns, improves readability, and makes it easier to reuse configurations across multiple flows.
In the next article, we’ll build a complete API and demonstrate how to manage configurations effectively using a dedicated configuration file.
✨ Hope you found this article informative!
If it helped you, share it with your friends or team — let’s spread the knowledge. 🙌
Cheers! 🚀
woh I am glad to find this website through google.
so much excellent information on here, : D.