
Overview
In this blog post, we will delve into the process of configuring RabbitMQ as a JMS provider within webMethods. This comprehensive guide will walk you through each step of setting up the necessary connection parameters in webMethods, ensuring a seamless integration with RabbitMQ. By the end, you’ll have a fully functional RabbitMQ setup integrated with webMethods, ready to handle your messaging needs efficiently.
What is RabbitMQ?
RabbitMQ is a powerful, open-source messaging broker that helps applications communicate with each other by sending and receiving messages. It uses a system of queues and exchanges to manage and route these messages efficiently. This allows different parts of an application, or different applications altogether, to work together and share information in real time, even if they’re written in different programming languages or running on different systems.
RabbitMQ is not a default JMS (Java Message Service) provider. RabbitMQ is an open-source message broker that implements the Advanced Message Queuing Protocol (AMQP). However, it can be used as a JMS provider with the help of additional plugins or libraries. For example, RabbitMQ provides a JMS Client library that allows you to use RabbitMQ as a JMS provider. This library helps bridge the gap between JMS and RabbitMQ, enabling you to leverage RabbitMQ’s messaging capabilities within JMS-based applications.
Prerequisites :
- RabbitMQ should be up and running.
- Basic understanding of producer and consumer concepts.
Enable plugins in RabbitMQ :
We need to enable the following plugins to set up the RabbitMQ connection in webMethods, which will help us connect to the RabbitMQ server.
- rabbitmq_amqp1_0 :
- The rabbitmq_amqp1_0 plugin in RabbitMQ enables support for the Advanced Message Queuing Protocol (AMQP) 1.0, which is a different protocol from the more commonly used AMQP 0-9-1 that RabbitMQ supports by default.
- To enable the plugin RabbitMQ installed on a Windows machine follow the below instructions.
- Navigate to the RabbitMQ sbin Directory.
- Run the command to enable the plugin.
rabbitmq-plugins.bat enable rabbitmq_amqp1_0
- Verify the Plugin is Enabled:
rabbitmq-plugins.bat list
- rabbitmq_jms_topic_exchange :
- The rabbitmq_jms_topic_exchange plugin in RabbitMQ enables the use of JMS (Java Message Service) topic semantics in RabbitMQ.
- To enable the plugin RabbitMQ installed on a Windows machine follow the below instructions.
- Navigate to the RabbitMQ sbin Directory.
- Run the command to enable the plugin.
rabbitmq-plugins.bat enable rabbitmq_jms_topic_exchange
- Verify the Plugin is Enabled:
rabbitmq-plugins.bat list
- The rabbitmq_jms_topic_exchange plugin in RabbitMQ enables the use of JMS (Java Message Service) topic semantics in RabbitMQ.
Create Virtual Host :
A virtual host (vhost) in RabbitMQ is a way to provide logical separation between different applications or groups of users within a single RabbitMQ server.
- Login to RabbitMQ managementUI (localhost:15672).
- Navigate to the Virtual Host section in the Admin tab and follow the below screenshot to create the Virtual Host.

Create an Exchange :
An exchange in RabbitMQ is a core component that routes messages to one or more queues based on routing rules defined by the exchange type and bindings. Exchanges are essential for the messaging system’s operation, enabling decoupling between message producers and consumers.
- Navigate to the Exchange tab and create an Exchange following the below screenshot, for more info please refer to the RabbitMQ official documentation.

Create a Queue and bind it to Exchange :
- Navigate to the ‘Queue and Streams’ tab and follow the below screenshot to create the Queue.

- Now to bind the queue to exchange, navigate to the Exchange tab and click on the myQueueExchange exchange which we created earlier.
- In the binding section, put the queue name(HG_TEST_QUEUE) which we created earlier, and bind it.

Prepare .bindings file :
- If you have created everything with the same name which we did as part of this session then you can directly use the .bindings file, else you can update the queue/exchange/vhost details.
#ConnectionFactoryObject
ConnectionFactory/ClassName=javax.jms.ConnectionFactory
ConnectionFactory/FactoryName=com.rabbitmq.jms.admin.RMQObjectFactory
ConnectionFactory/RefAddr/0/Content=jms/ConnectionFactory
ConnectionFactory/RefAddr/0/Type=name
ConnectionFactory/RefAddr/0/Encoding=String
ConnectionFactory/RefAddr/1/Content=javax.jms.ConnectionFactory
ConnectionFactory/RefAddr/1/Type=type
ConnectionFactory/RefAddr/1/Encoding=String
ConnectionFactory/RefAddr/2/Content=com.rabbitmq.jms.admin.RMQObjectFactory
ConnectionFactory/RefAddr/2/Type=factory
ConnectionFactory/RefAddr/2/Encoding=String

#host
ConnectionFactory/RefAddr/3/Content=localhost
ConnectionFactory/RefAddr/3/Type=host
ConnectionFactory/RefAddr/3/Encoding=String

#vhost
ConnectionFactory/RefAddr/4/Content=my_vhost
ConnectionFactory/RefAddr/4/Type=vhost
ConnectionFactory/RefAddr/4/Encoding=String

#uname
ConnectionFactory/RefAddr/5/Content=guest
ConnectionFactory/RefAddr/5/Type=username
ConnectionFactory/RefAddr/5/Encoding=String

#password
ConnectionFactory/RefAddr/6/Content=guest
ConnectionFactory/RefAddr/6/Type=password
ConnectionFactory/RefAddr/6/Encoding=String

#Port
ConnectionFactory/RefAddr/7/Content=5672
ConnectionFactory/RefAddr/7/Type=port
ConnectionFactory/RefAddr/7/Encoding=String

#SSL
ConnectionFactory/RefAddr/8/Content=false
ConnectionFactory/RefAddr/8/Type=ssl
ConnectionFactory/RefAddr/8/Encoding=String

#uri
ConnectionFactory/RefAddr/9/Content=amqp://guest:guest@localhost:5672/my_vhost
ConnectionFactory/RefAddr/9/Type=uri
ConnectionFactory/RefAddr/9/Encoding=String

#Queue details(HG_TEST_QUEUE)
HG_TEST_QUEUE/ClassName=javax.jms.Queue
HG_TEST_QUEUE/FactoryName=com.rabbitmq.jms.admin.RMQObjectFactory
HG_TEST_QUEUE/RefAddr/0/Content=jms/Queue
HG_TEST_QUEUE/RefAddr/0/Type=name
HG_TEST_QUEUE/RefAddr/0/Encoding=String
HG_TEST_QUEUE/RefAddr/1/Content=javax.jms.Queue
HG_TEST_QUEUE/RefAddr/1/Type=type
HG_TEST_QUEUE/RefAddr/1/Encoding=String
HG_TEST_QUEUE/RefAddr/2/Content=com.rabbitmq.jms.admin.RMQObjectFactory
HG_TEST_QUEUE/RefAddr/2/Type=factory
HG_TEST_QUEUE/RefAddr/2/Encoding=String
HG_TEST_QUEUE/RefAddr/3/Content=HG_TEST_QUEUE
HG_TEST_QUEUE/RefAddr/3/Type=destinationName
HG_TEST_QUEUE/RefAddr/3/Encoding=String
HG_TEST_QUEUE/RefAddr/4/Content=true
HG_TEST_QUEUE/RefAddr/4/Type=amqp
HG_TEST_QUEUE/RefAddr/4/Encoding=String
HG_TEST_QUEUE/RefAddr/5/Content=myQueueExchange
HG_TEST_QUEUE/RefAddr/5/Type=amqpExchangeName
HG_TEST_QUEUE/RefAddr/5/Encoding=String
HG_TEST_QUEUE/RefAddr/6/Content=HG_TEST_QUEUE
HG_TEST_QUEUE/RefAddr/6/Type=amqpRoutingKey
HG_TEST_QUEUE/RefAddr/6/Encoding=String
HG_TEST_QUEUE/RefAddr/7/Content=HG_TEST_QUEUE
HG_TEST_QUEUE/RefAddr/7/Type=amqpQueueName
HG_TEST_QUEUE/RefAddr/7/Encoding=String
- Create a folder with the name ‘rabbitMQ‘ in ‘C:\SoftwareAG\IntegrationServer‘ location.
- Save the above content as ‘.bindings’ in ‘rabbitMQ’ folder.
Jar setup :
We need to place the RabbitMQ-related jars in the C:\SoftwareAG\IntegrationServer\lib\jars location. If you have the jars, place them in this directory and restart the server. Otherwise, you can download the required jars using the link provided at the bottom of this post. Please note that we are not the owners of these jars; they were downloaded from the internet and the RabbitMQ site, so use them at your own risk.
Create JNDI Provider Alias :
- Login to webMethods administration page.
- Navigate to ‘JNDI Setting‘ under ‘Messaging’ and click on ‘Create JNDI Provider Alias‘ option to create the JNDI connection alias.
- Once the create form is opened fill details as shown in the screenshot, please note the folder location can be different based on the integration server installation directory.

- Once you create the JNDI settings, do the test lookup for the connection that we created, it should be successful.

Create JMS Connection Alias :
- Navigate to the ‘JMS Settings’ tab under messaging.
- Click on ‘Create JMS Connection Alias‘ option to create the alias and follow the below screenshot to create it.

- Once you create the connection alis, enable it.

Create Package for RabbitMQ Pub/Sub :
- Create a package with the name ‘HG_RabbitMQ_PubSub‘ and follow the below package structure.
- HG_RabbitMQ_PubSub
- v1
- pub
- sub
- v1
- HG_RabbitMQ_PubSub
Send message to RabbitMQ :
- Create a flow service in ‘pub‘ folder with the name ‘publishEvent‘.
- Invoke the ‘pub.jms:send‘ service and hard code the values below. Please note that this is only for demonstration purposes, you can modularize this based on your requirements.
- connectionAliasName ->’DemoRabbitMQAlias’.
- destinationName->’HG_TEST_QUEUE’.
- destinationType->’QUEUE’.
- JMSMessage/body/string-> ‘Hi From webMethods’.
- Run the flow service, the run should be successful.
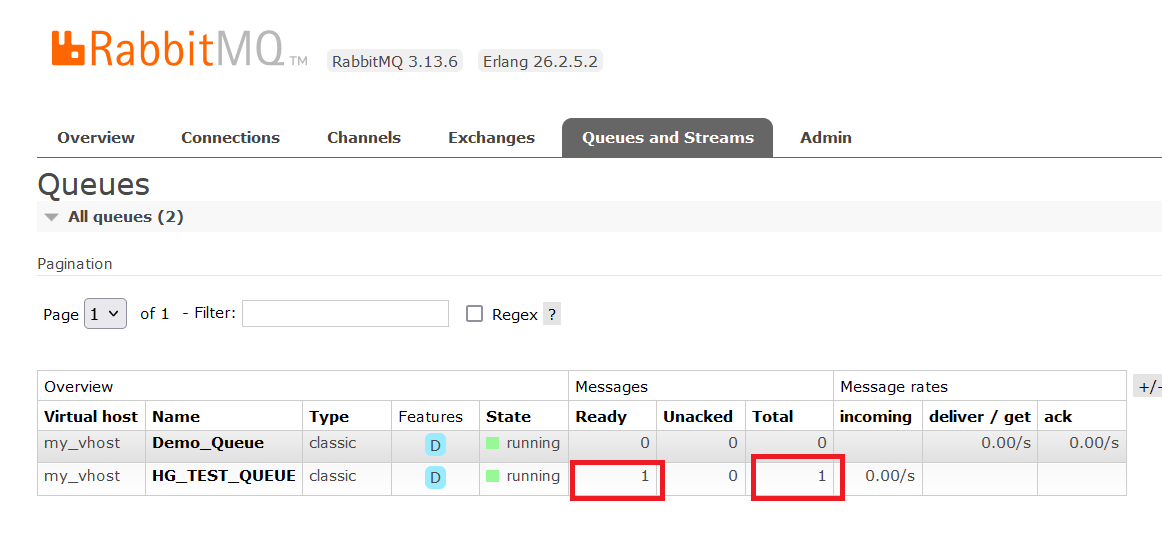
- Navigate to ‘Queues and Streams‘ tab, you will see that 1 message is published to the Queue.
Subscribe message from RabbitMQ :
- Create a flow service in ‘sub‘ folder with the name ‘subscribeEvent‘.
- In the input section of the service, create a document with the name ‘JMSMessage‘ by referring to it from ‘pub.jms:JMSMessage‘.
- Invoke ‘pub.string:bytesToString‘ and map ‘bytes‘ from ‘JMSMessage/body/bytes‘.
- Invoke ‘pub.flow:debugLog‘ and map ‘string‘ to ‘message‘.
- Create a JMS trigger in ‘sub‘ folder and follow the below configuration.

- Now keep sending messages to the queue, and you will see the subscription.

Download resources :
Download Jar from GitHub!

Download the Package from GitHub!
I gotta favorite this site it seems very useful extremely helpful