Overview :
In today’s digital landscape, effective email communication plays a vital role for both businesses and individuals. While traditional plain-text emails fulfill their basic purpose, the integration of HTML elements adds a layer of visual richness and dynamism. This guide offers a comprehensive resource for users seeking to optimize their email communication by leveraging HTML through the Simple Mail Transfer Protocol (SMTP).
It highlights the importance of using SMTP to make sure your emails reliably reach their destination. The guide then takes you step by step, showing you how to create your visually appealing HTML content and set up your SMTP server for smooth email delivery.
Prerequisites :
- SMTP server details with active credentials.
- Minimal knowledge of HTML and CSS.
Creating an app password for your Gmail:
We will be using Gmail for SMTP communication as part of this article so we need to create the application password in Gmail itself for the authentication, if you have an active application password then you can use it else follow the below steps to create the same.
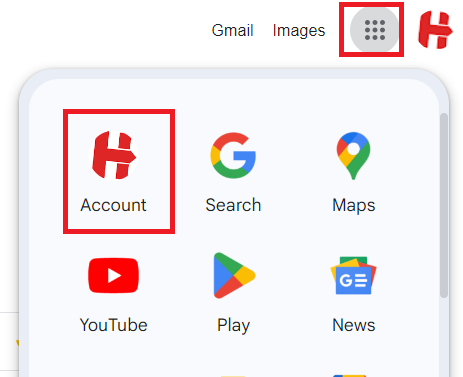
- Login to your Gmail account and click on the dot icon.
- Once you click on the dot icon, you will be able to see various Google products. Click on the “Account” option.
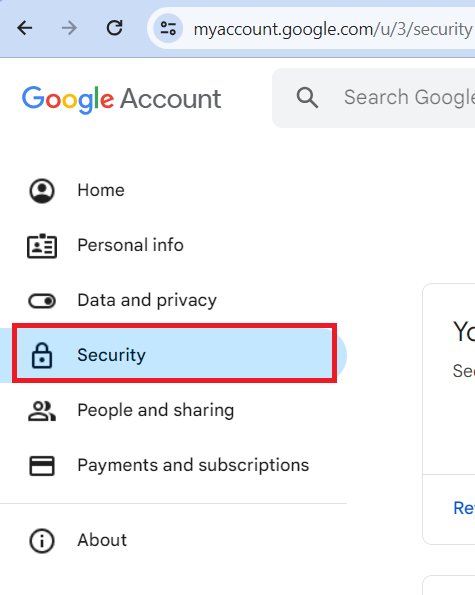
- In the Account page click on the “Security” tab.
- To create an application password, you should first enable ‘2-step verification‘ enable it by clicking on the ‘2-step verification‘ link, which will prompt you to authenticate your account using your account password.

- On the ‘2-Step Verification’ page, click on the ‘App passwords’ section located at the bottom.

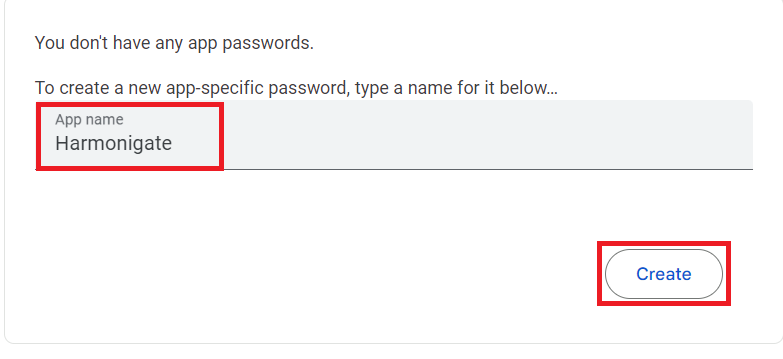
- Give a name to your application and click the create button; it will display the key. Copy and save it somewhere.
Consider these points when sending HTML via SMTP :
- Inline Styles Preferred:
Many email clients have limited support for external stylesheets. To ensure consistent rendering across different email clients, it’s often recommended to use inline styles directly within HTML elements.
- Style in the
<head>:
Including styles in the<head>section of your HTML document is a common practice. While some email clients may support it, others might not fully interpret external stylesheets. Therefore, it’s essential to include fallback inline styles if possible.
Code Area :
- Create a package and give it a proper name.
- Create below package structure.
- PackageName
- Services
- PackageName
- Create a flow service inside the services folder and give it a proper name.
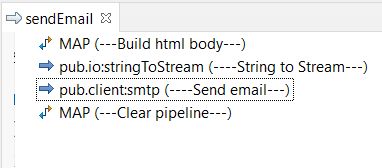
- Insert one map step and create a string variable with the name ‘htmlBody‘ to hold the HTML body.
- Hardcode the HTML code into the htmlBody variable. In a real-life project, you can dynamically generate it at runtime using XSLT and then process it. Click here to read the article on XSLT
- Invoke ‘pub.io:stringToStream‘ service and map htmlBody to string variable to convert the string to a byte stream.
- Invoke ‘pub.client:smtp‘ service and map the following to send the email and you can explore the optional field as well.
- to -> Receiver email ID.
- subject -> Provide a subject to the email.
- from -> Provide the email id to specify the sender.
- mailhost -> Set it to smtp.gmail.com if you are using the Gmail server else you can specify the server host here.
- mailhostPort ->Set it to 465 if you are using the Gmail server else you can specify the server port here.
- auth/type -> Set it to Basic.
- auth/user -> Set it to your email id
- auth/pass -> Set it to the password that we have generated in the previous section.
- secure/transportLayerSecurity -> Set it to implicit.
- attachments[0]/contenttype -> Set it to text/html.
- attachments[0]/content -> inputStream which we have generated previously from the HTML body.
- Add one map step and drop all unnecessary variables and keep status in the pipeline which you can check to confirm whether the email is sent or not.
- If you have followed every step properly then the flow service will look like below.
- Now run the flow service to verify the email communication.

Please click on the download link below to access the source code.

It’s actually a nice and helpful piece of info. I am glad that you shared this helpful info with us. Please keep us up to date like this. Thanks for sharing.