Overview
In real-world MuleSoft projects, applications rarely run in just one environment. We usually have DEV, QA, UAT, and PROD, and each environment has its own values for things like database URLs, usernames, passwords, API endpoints, and keys.
If these values are hardcoded inside Mule flows, changing environments becomes risky and time-consuming. Even worse, sensitive data like passwords may get exposed in code or version control.
This is where externalizing and securing properties in MuleSoft becomes important.
It allows us to move environment-specific and sensitive values out of the code and manage them safely.
Why Externalizing Properties Is Needed ?
Let’s understand this with a simple example.
❌ Without externalized properties
Imagine your database connection is defined like this:
<db:mysql-config host="localhost" user="root" password="root123"/>
Now think about:
DEV database → different host
QA database → different credentials
PROD database → highly secure credentials
Every time you deploy to another environment, you need to edit the code.
This leads to:
Manual mistakes
Multiple code versions
Security risks
Difficult deployments
✅ With externalized properties
Instead, you keep values in a properties file:
db.host=localhost
db.user=root
db.password=Vbbnvbnvs@iXb
And use them in Mule like:
host="${db.host}"
user="${db.user}"
password="${db.password}"
Now:
Same code works in all environments
Only property files change
Sensitive data stays protected
Why Securing Properties Is Important ?
Externalizing alone is not enough.
If passwords and secrets are stored in plain text:
db.password=root123
Anyone with access to the file or Git repository can see them.
This is a big security risk, especially in production.
MuleSoft provides Secure Properties to solve this problem by:
- Encrypting sensitive values
- Allowing decryption only at runtime
- Keeping secrets out of plain sight
Example:
db.password=![encrypted_value]
Even if someone opens the file, the real password is not visible.
Externalize configuration properties
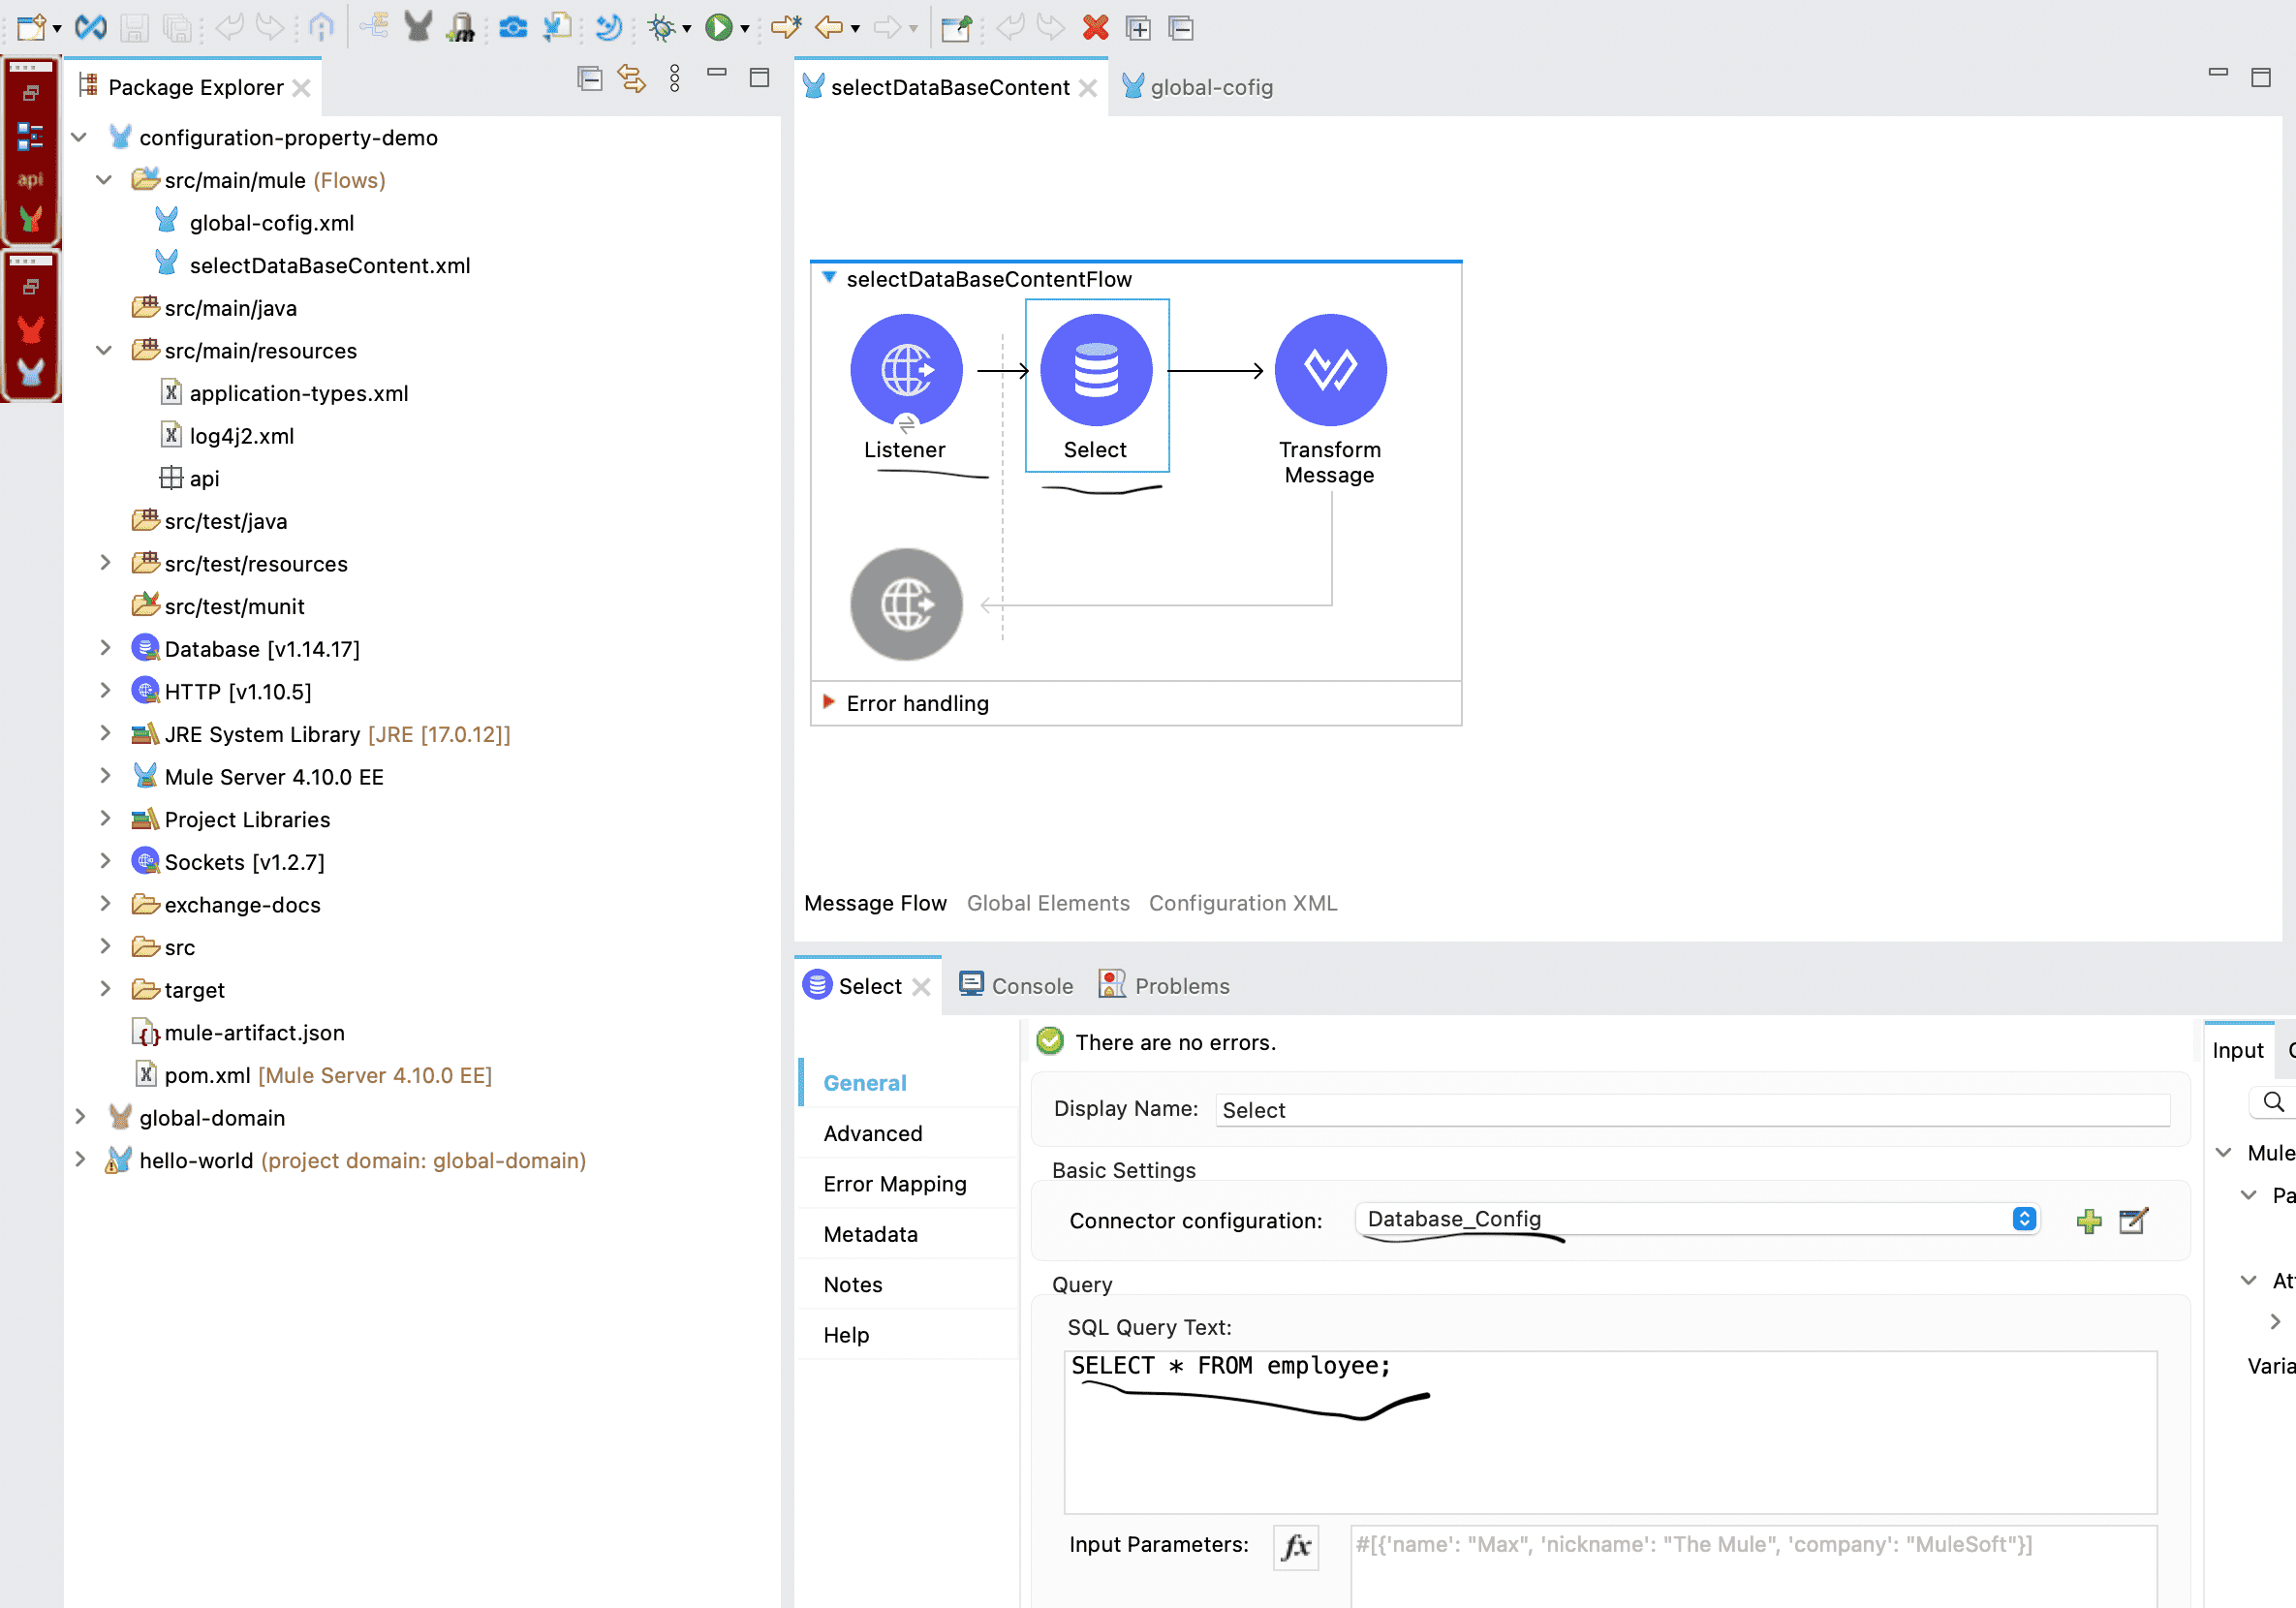
As of now, we have created a Mule project where all the database-related information is hardcoded in a global configuration. This global config contains details such as the database host, username, password, and port.
We also have a separate Mule configuration file where an HTTP Listener is configured. From this flow, we are using a Database Select operation to fetch all the records (rupees) from the database.
At this stage, the application works fine, but the database configuration is tightly coupled with the code, which makes it difficult to manage across different environments.


If you are new to the database operation in Mule then we would highly recommend you to check out our article on the database connector and get back to this article after completion of database connector article.
To externalize the configuration properties, create a file named
app-dev.propertiesunder thesrc/main/resourcesfolder. This file will store all the database-related details that are currently hardcoded in the Mule application. Similarly like the dev property, we need to make sure that we have other environment property file in the same place with environment specific properties.For example, your properties file can look like this:
db.host=88.222.241.120
db.port=3306
db.user=root
db.password=jgghffgh3egg
db.database=Mulesoft
- Next, go to your global configuration file where the database connection is defined. Wherever database details are hardcoded, replace them with references to the properties defined in the file.
Replace the database host with
${db.host}Replace the port with
${db.port}Replace the username with
${db.user}Replace the password with
${db.password}Replace the database name with
${db.database}Once this is done, the database configuration is no longer tied to the code, making it easier to manage and change values across different environments.
Now we need to tell the Mule application which property file it should read when it starts.
For this, open
global-config.xml, where we usually keep all our global configurations. Go to Global Elements, click on Create, and search for Configuration Properties. Add this component to the project.In the File field, enter:
This simply means Mule will load the property file based on the environment it is running in. For example, if the application is started with
env=dev, Mule will pick upapp-dev.properties. If it’s started withenv=qaorenv=prod, the corresponding properties file will be loaded automatically.The
envvalue is passed at runtime, which allows us to use the same code for all environments without making any changes.- Run the Mule project as a Mule Application (Configure). In the run configuration window, go to the Arguments tab and add the following at the end: -M-Denv=dev. This tells Mule which environment-specific properties file to use. You can change the
envvalue (for example,dev,qa, orprod) based on the environment where the application is deployed.
Securing properties :
As of now, the credentials are still visible in the properties file, which is a security concern. Sensitive information such as database usernames and passwords should not be stored in plain text.
To address this, the credential details must be encrypted in the properties file and decrypted at runtime when the application connects to the database. This is where Secure Properties come into the picture in MuleSoft.
Secure properties allow us to protect sensitive values while still enabling the application to use them safely during runtime. We can encrypt whole file or a specific value.
- As we need to encrypt file, we need to download the mulesoft provided jar from Mulesoft documentation portal.
- We can encrypt string value corresonds to the key or we can also encrypt whole file, for this we will encrypt the value for the key individually and store it in the property file.
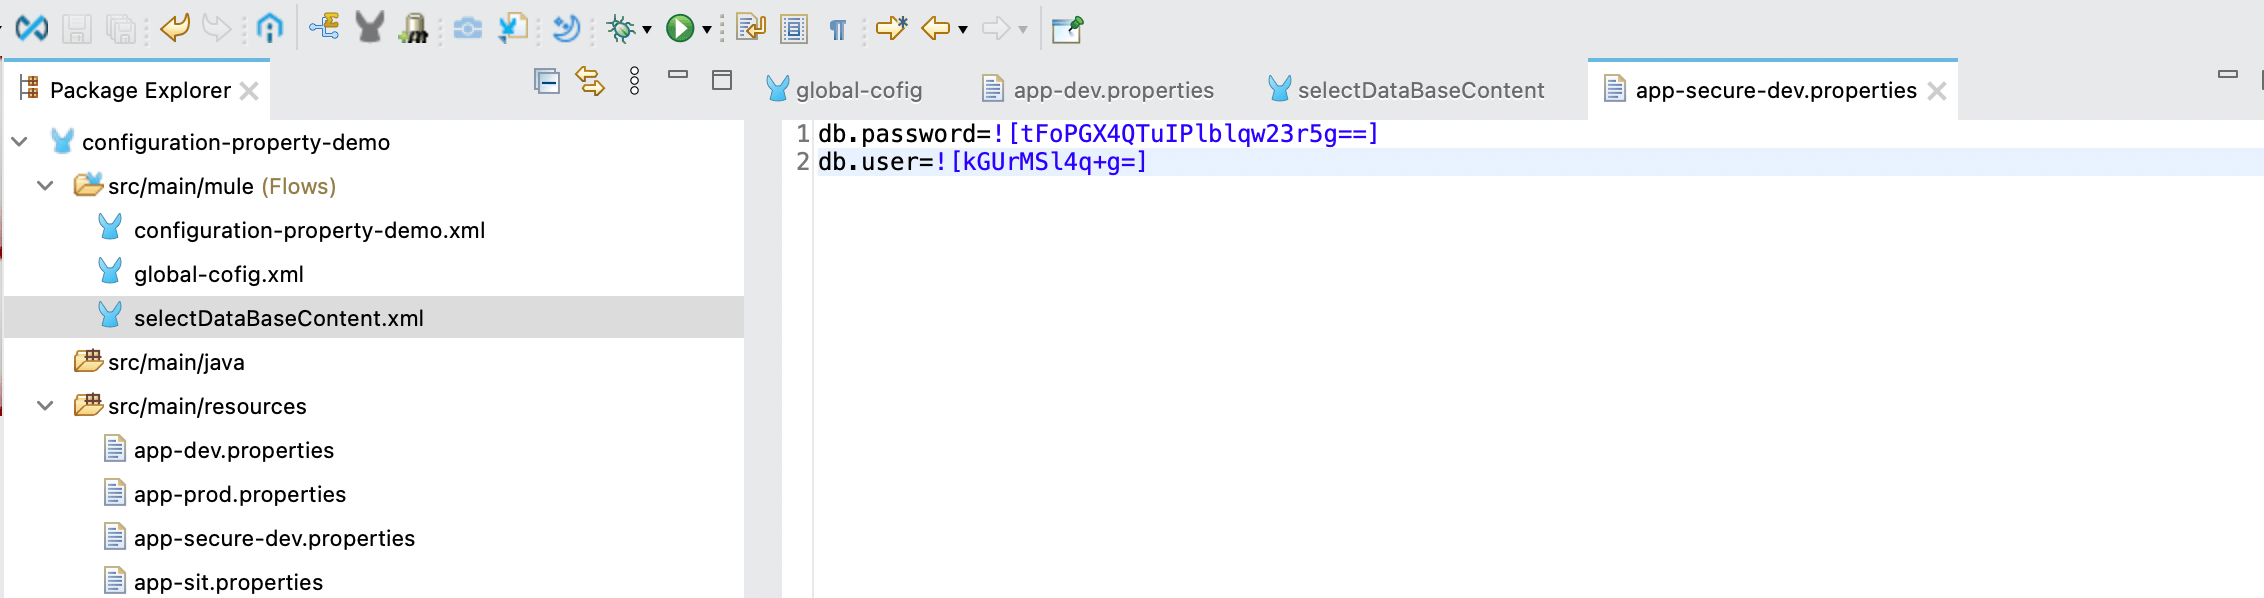
- Create another config file with name app-secure-dev.properties and add the db.user and db.password key value pair and make sure remove it from the app-dev.properties file.
- Now to encrypt the user and password run below command
Syntax :
java -cp secure-properties-tool.jar com.mulesoft.tools.SecurePropertiesTool \
<method> \
<operation> \
<algorithm> \
<mode> \
<key> \
<value> \
--use-random-iv [optional]

Example :

java -cp secure-properties-tool-j17.jar com.mulesoft.tools.SecurePropertiesTool \
string \
encrypt \
Blowfish \
CBC \
mulesoft \
"root"

similarly do it for password as well and the output store the encrypted value as value for the key sorrounded with ![].
- Now your secure property file should look like below.
- As the data needs to be decrypted in the run time, we need the secure configuration properties so we need to add the module from exchange, click on search on Exchange with secure and install secure configuration property.
- In the secure property configure the secure property file path along with the algorithm, mode and key, once this is done, you will be above to run the program with secure properties.
Hope this article was informative, for more information please checkout the official documentation.