
Overview
This is the final article on the PayloadVault project. If you have not checked out the previous articles on this project, we recommend that you do so for better understanding. You can find the links for each article below. In this article, we will focus on the following tasks:
- View Payload in UI with color.
Check out the full project :
Prerequisite
- Basics of JDBC adapter.
- Basics of SQL queries.
- Basics of DSP page with HTML, CSS, and javascript.
Write Flow service to get Transactions
If you remember, in the previous article, we grouped each transaction based on trackingID, and the count was displayed as a hyperlink in the UI. We also created an event listener in the script.js file, which submits the details to the viewTransaction.dsp page. Now, we need to get the data in the flow service and return the individual transactions to the UI to make it fully functional.
- Create JDBC Adapter :
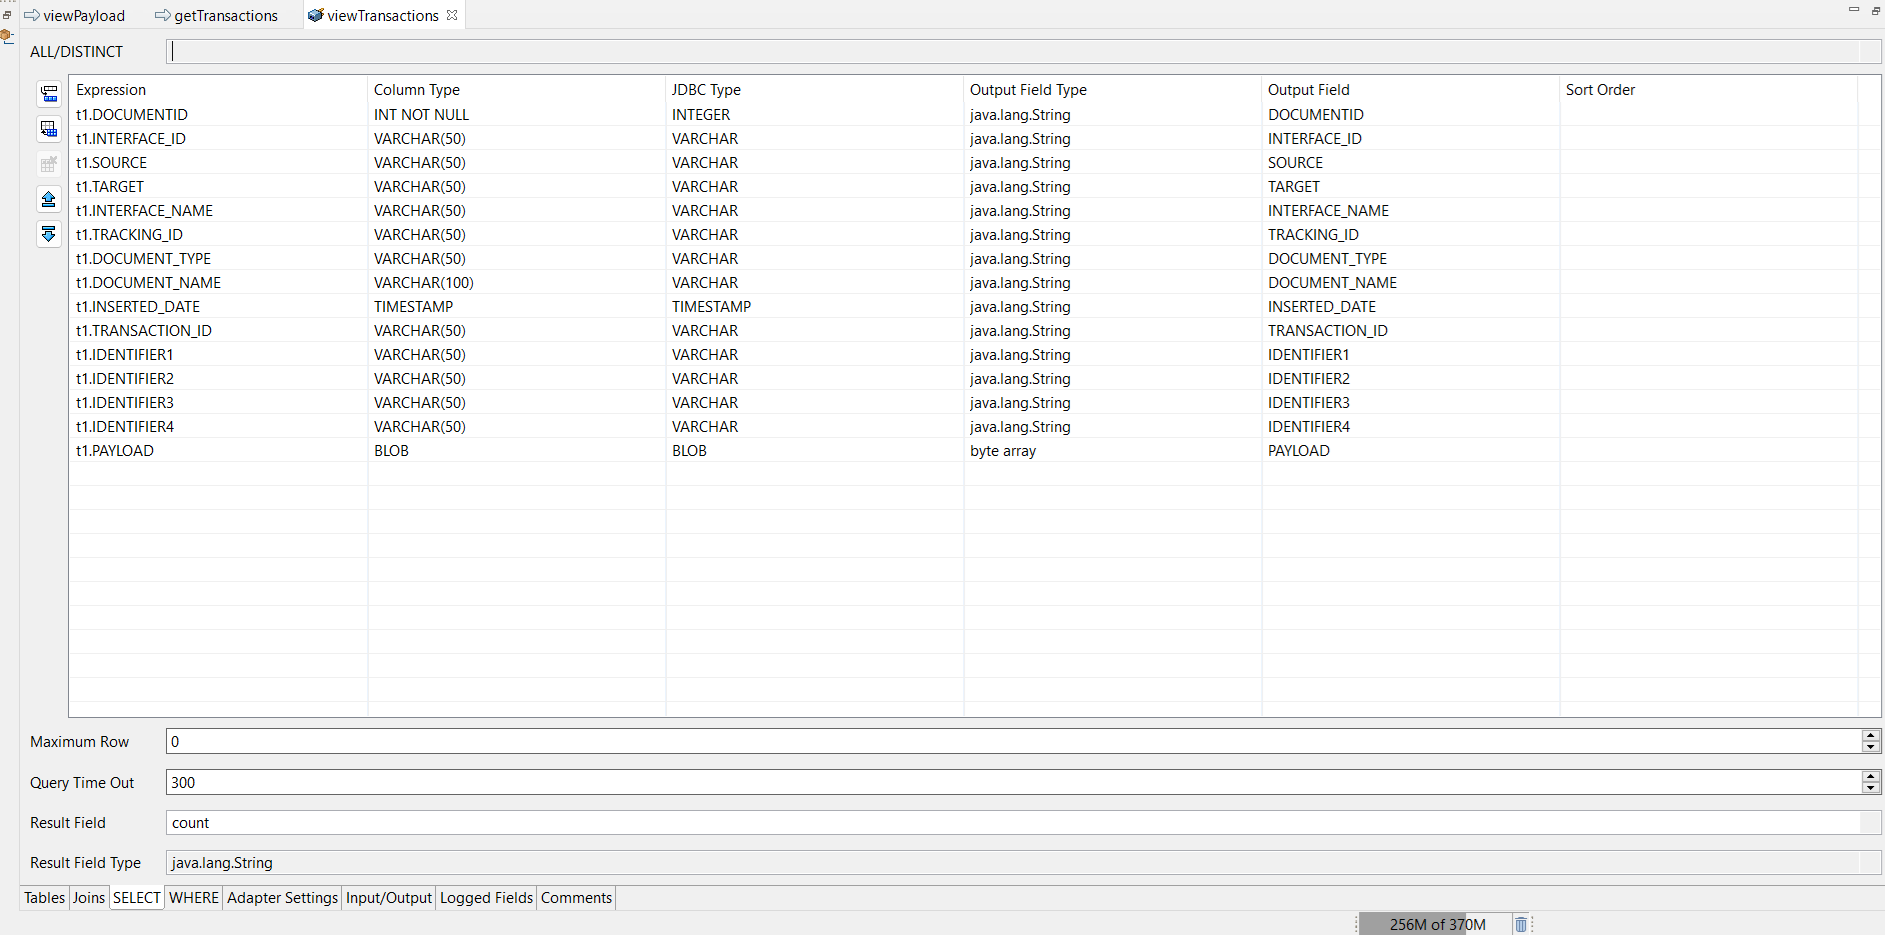
- Create a JDBC adapter named ‘viewTransactions‘ in the ‘HG_PayloadVault.v1.UI.adapter‘ location and use the select template.
- Now, in the Table tab, select the ‘PayloadVault‘ table and refer to the screenshots below to configure the Select and Where tabs accordingly, save it.

- Create Flow service :
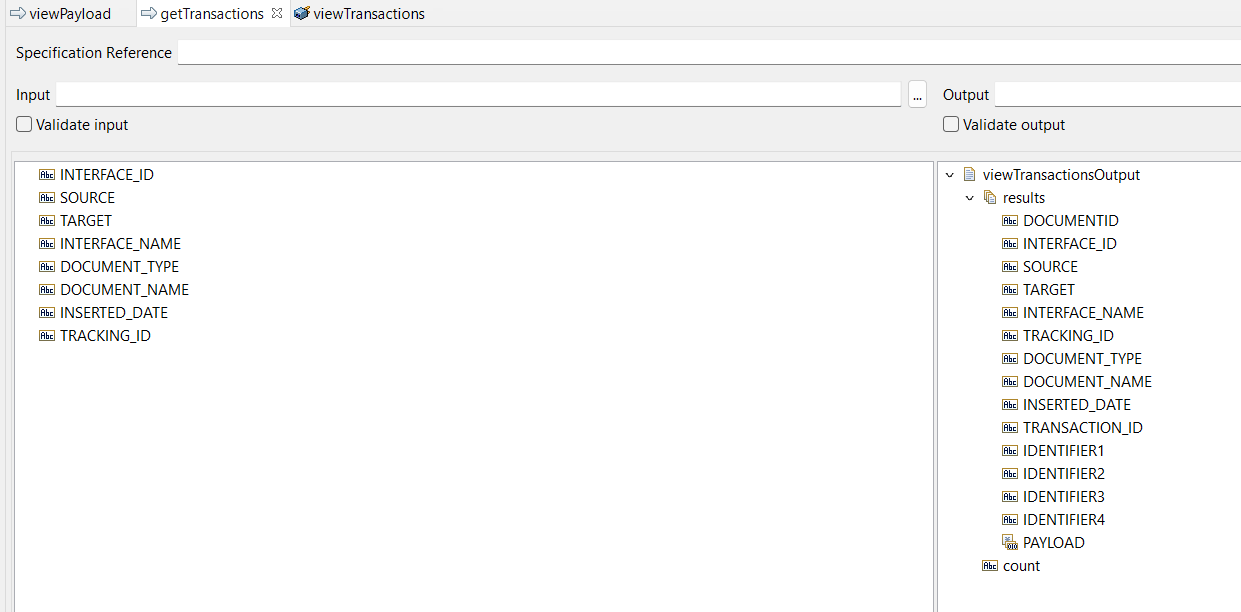
- Create a flow service named ‘getTransactions‘ in the ‘HG_PayloadVault.v1.UI‘ location and create the input and output as shown in the screenshot below.
- Invoke ‘HG_PayloadVault.v1.UI.adapter:viewTransactions‘ adapter and follow the below mapping.
- INTERFACE_ID ->viewTransactionsInput/interface_Id.
- SOURCE->viewTransactionsInput/source.
- TARGET->viewTransactionsInput/target.
- INTERFACE_NAME->viewTransactionsInput/interfaceName.
- DOCUMENT_TYPE->viewTransactionsInput/documentType.
- DOCUMENT_NAME->viewTransactionsInput/documentName.
- TRACKING_ID->viewTransactionsInput/trackingId.
- Invoke the Branch step and in the switch property put ‘viewTransactionsOutput/results[0]‘, you can also check for the count variable and it’s value greater than 0.
- Invoke the exit step inside the Branch step and set the following property below.
- Set Label to $null.
- Set Signal to FAILURE.
- Set Exist From property to $flow.
- Set the Failure message to ‘No data found in database.‘
- Create a flow service named ‘getTransactions‘ in the ‘HG_PayloadVault.v1.UI‘ location and create the input and output as shown in the screenshot below.
Write Flow service to View payload
We need to create an adapter to retrieve the payload from the database and a flow service to send it back to UI.
- Create JDBC Adapter :
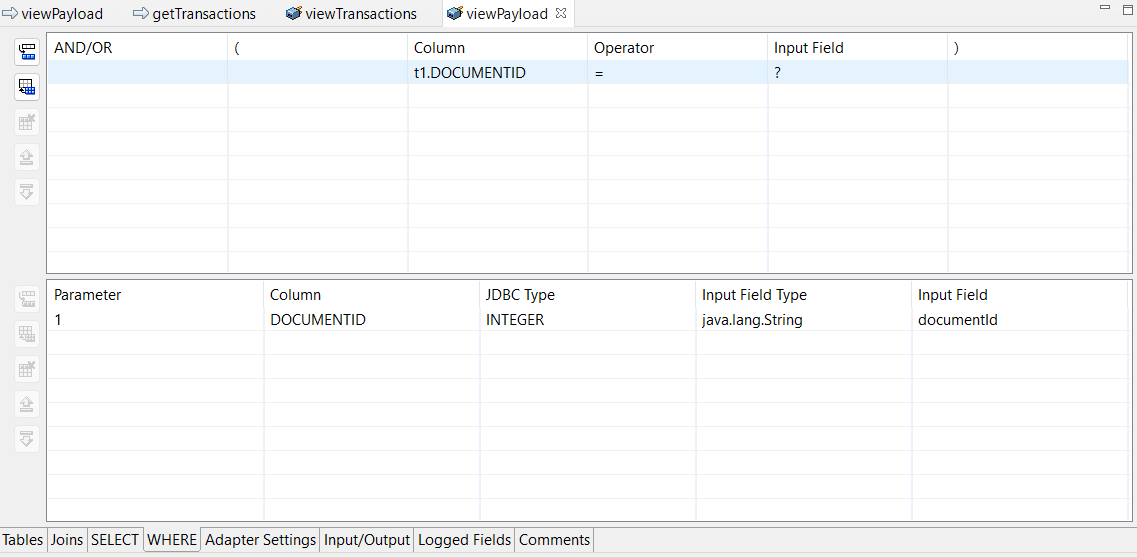
- Create a JDBC adapter named ‘viewPayload‘ in the ‘HG_PayloadVault.v1.UI.adapter‘ location and use the Select template.
- In the Table tab, select the ‘PayloadVault‘ table and follow the screenshot below to configure the Select and Where tabs.

- Create flow service :
- Create a flow service with the name ‘viewPayload‘ in ‘HG_PayloadVault.v1.UI‘ location.
- In the input section of the flow service, create a string variable named ‘DOCUMENTID‘. In the output section of the flow service, create a string variable named ‘payload‘.
- Invoke the ‘HG_PayloadVault.v1.UI.adapter:viewPayload‘ adapter that we created in the previous step, and follow the mapping below.
- DOCUMENTID ->viewPayloadInput/documentId.
- Invoke ‘pub.string:bytesToString‘ service to convert bytes to string and follow the below mapping.
- viewPayloadOutput/results[0]/PAYLOAD ->bytes.
- Set encoding to UTF-8.
- Invoke the Branch step and in the switch property put ‘payload‘.
- Invoke the Exit step inside the Branch step and set the properties below.
- Set Label to $null.
- Set Signal to FAILURE.
- Set Exit from to $flow.
- Set Failure message to ‘No Payload found !!’
View payload in UI
List Transactions :
- Create ‘viewTransaction.dsp‘ file in the ‘HG_PayloadVault‘ package pub directory.
- Now put the below script into the file to list the transactions.
<!DOCTYPE html> <html lang="en"> <head> <meta charset="UTF-8"> <meta name="viewport" content="width=device-width, initial-scale=1.0"> <title>Payload Vault</title> <link rel="stylesheet" href="css\stylesheet.css"> </head> <body> <header> <img src="image\harmonigate.png" alt="Harmonigate.com"> <h1>Payload Vault</h1> </header> <div class="table-container"> <table> <thead> <tr> <th>Document Id</th> <th>Interface Id</th> <th>Source</th> <th>Target</th> <th>Interface Name</th> <th>Tracking Id</th> <th>Document Type</th> <th>Document Name</th> <th>Inserted date</th> <th>Transaction Id</th> <th>Identifier 1</th> <th>Identifier 2</th> <th>Identifier 3</th> <th>Identifier 4</th> <th>Payload</th> </tr> </thead> %invoke HG_PayloadVault.v1.UI:getTransactions% <tbody> %loop viewTransactionsOutput/results% <tr> <td>%value DOCUMENTID%</td> <td>%value INTERFACE_ID%</td> <td>%value SOURCE%</td> <td>%value TARGET%</td> <td>%value INTERFACE_NAME%</td> <td>%value TRACKING_ID%</td> <td>%value DOCUMENT_TYPE%</td> <td>%value DOCUMENT_NAME%</td> <td>%value INSERTED_DATE%</td> <td>%value TRANSACTION_ID%</td> <td>%value IDENTIFIER1%</td> <td>%value IDENTIFIER2%</td> <td>%value IDENTIFIER3%</td> <td>%value IDENTIFIER4%</td> <td><a href="" class="capture-payload">View</a></td> </tr> %endloop% <!-- Add more rows as needed --> </tbody> %onerror% <HR> <P> <FONT COLOR="#FF0000">%value errorMessage%</FONT> </P> %endinvoke% </table> </div> </body> <script> document.addEventListener('DOMContentLoaded', function () { // Get all anchor tags with class 'capture-row-data' var editLinks = document.querySelectorAll('.capture-payload'); // Attach click event listeners to each anchor tag editLinks.forEach(function (link) { link.addEventListener('click', function (event) { event.preventDefault(); // Prevent the default behavior of the anchor tag // Traverse up the DOM to find the parent 'tr' element (table row) var row = event.target.closest('tr'); var url = "viewPayload.dsp?DOCUMENTID=" + row.cells[0].innerText; console.log(url); window.open(url, "_blank"); }); }); }); </script> </html> - Now, if you closely observe the table, it has a view anchor, and we have a click event listener for it. When the anchor is clicked, it will redirect to the viewPayload.dsp page, passing DOCUMENTID as a URL parameter. This parameter allows us to extract the payload from the database.
View Payload :
We need to create the viewPayload.dsp file to accept the DOCUMENTID, process it, and display the payload. Additionally, we will beautify it and add some coloring for a better appearance.
- Create ‘viewPayload.dsp‘ file in the ‘HG_PayloadVault‘ package pub directory.
- Now put the below script into the viewPayload.dsp file which will invoke our backed flow service and populate the payload with color effect.
<!DOCTYPE html>
<html lang="en">

<head>
    <meta charset="UTF-8">
    <meta name="viewport" content="width=device-width, initial-scale=1.0">
    <title>PayloadVault</title>
    <style>
        body {
            font-family: Arial, sans-serif;
            display: flex;
            justify-content: center;
            align-items: flex-start;
            /* Changed to align items at the top */
            height: 100vh;
            background-color: #f0f0f0;
            margin: 0;
            padding-top: 20px;
            /* Added padding to create space at the top */
        }

        .container {
            position: relative;
            width: 80%;
            max-width: 800px;
            padding: 20px;
            background-color: #fff;
            box-shadow: 0 0 10px rgba(0, 0, 0, 0.1);
            border-radius: 8px;
        }

        #content {
            white-space: pre-wrap;
            word-wrap: break-word;
            max-height: 400px;
            overflow-y: auto;
            padding: 20px;
            border-radius: 8px;
            background-color: #f9f9f9;
            /* Light background for the content area */
            margin-top: 10px;
            font-family: 'Courier New', Courier, monospace;
            font-size: 14px;
        }

        #copyButton {
            position: absolute;
            top: 10px;
            right: 10px;
            background-color: #007BFF;
            color: #fff;
            border: none;
            padding: 8px 12px;
            border-radius: 4px;
            cursor: pointer;
        }

        #copyButton:hover {
            background-color: #0056b3;
        }

        .xml .tag {
            color: #22863a;
        }

        .xml .attribute {
            color: #6f42c1;
        }

        .xml .value {
            color: #e36209;
        }

        .xml .comment {
            color: #6a737d;
        }

        .json .key {
            color: #d73a49;
        }

        .json .string {
            color: #032f62;
        }

        .json .number {
            color: #005cc5;
        }

        .json .boolean {
            color: #d73a49;
        }

        .json .null {
            color: #6a737d;
        }
    </style>
    <link rel="stylesheet" href="https://cdnjs.cloudflare.com/ajax/libs/highlight.js/11.5.0/styles/default.min.css">
</head>

<body>
    <div class="container">
        %invoke HG_PayloadVault.v1.UI:viewPayload%
        <pre id="content">%value payload%</pre>
        %endinvoke%
        <button id="copyButton">Copy to Clipboard</button>
    </div>

    <script src="https://cdnjs.cloudflare.com/ajax/libs/highlight.js/11.5.0/highlight.min.js"></script>
    <script src="https://cdnjs.cloudflare.com/ajax/libs/highlight.js/11.5.0/languages/json.min.js"></script>
    <script src="https://cdnjs.cloudflare.com/ajax/libs/highlight.js/11.5.0/languages/xml.min.js"></script>
    <script>
        document.addEventListener("DOMContentLoaded", () => {
            const contentElement = document.getElementById("content");
            const copyButton = document.getElementById("copyButton");
            let data = contentElement.innerText.trim();

            const formatXml = (xml) => {
                const PADDING = ' '.repeat(2); // set desired indent size here
                const reg = /(>)(<)(\/*)/g;
                let pad = 0;

                xml = xml.replace(reg, '$1\r\n$2$3');
                return xml.split('\r\n').map((node, index) => {
                    let indent = 0;
                    if (node.match(/.+<\/\w[^>]*>$/)) {
                        indent = 0;
                    } else if (node.match(/^<\/\w/)) {
                        if (pad != 0) {
                            pad -= 1;
                        }
                    } else if (node.match(/^<\w[^>]*[^\/]>.*$/)) {
                        indent = 1;
                    } else {
                        indent = 0;
                    }

                    pad += indent;
                    return PADDING.repeat(pad - indent) + node;
                }).join('\r\n');
            };

            try {
                // Try to parse the data as JSON
                const jsonObject = JSON.parse(data);
                data = JSON.stringify(jsonObject, null, 2);
                contentElement.className = 'json';
            } catch (e) {
                // If it fails, assume it is XML and format accordingly
                data = formatXml(data);
                contentElement.className = 'xml';
            }

            contentElement.textContent = data;
            hljs.highlightElement(contentElement);

            copyButton.addEventListener("click", () => {
                navigator.clipboard.writeText(contentElement.textContent)
                    .then(() => {
                        alert("Content copied to clipboard!");
                    })
                    .catch(err => {
                        console.error("Failed to copy content: ", err);
                    });
            });
        });
    </script>
</body>

</html>
We have completed our project and it is ready for testing, please ensure to create a scheduler job to clear the data from the database. Although we have not covered that in this project, if you are downloading the resource, the scheduler job will be included in the build for you to use :).
Configuration required :
- Global Variable setup :
- Below global variables are required to run this project so refer below screenshot create it.

- Below global variables are required to run this project so refer below screenshot create it.
- JDBC Connection Setup :
- A JDBC connection is required to run this project. Please refer to the screenshot below and create your JDBC connection with your preferred database.

- A JDBC connection is required to run this project. Please refer to the screenshot below and create your JDBC connection with your preferred database.
Testing :
Download resources:
Download source code from Git Hub.

Hope you have enjoyed this article, Cheers!