Overview
webMethods Trading Networks (TN) is a B2B gateway that enables organizations to exchange business documents securely and efficiently with partners. It provides a centralized platform to manage partner profiles, document types, processing rules, and transaction tracking. TN helps businesses streamline electronic data interchange (EDI), XML, flat files, and other business document formats, ensuring structured and automated communication between trading partners.
Why Use TN for SFTP File Delivery?
When delivering files to an SFTP server via Trading Networks, businesses gain several advantages, including:
- Centralized Partner Management – TN allows organizations to maintain partner profiles, security settings, and communication preferences in a single place, reducing manual effort.
- Automated Routing & Processing – TN can automatically recognize, validate, and process incoming documents based on predefined rules before delivering them to an SFTP location.
- Enhanced Security – SFTP ensures encrypted file transfer, and TN helps enforce authentication, access control, and compliance with security policies.
- Transaction Tracking & Audit Logs – Every file transfer is logged and tracked within TN, providing full visibility into transactions and ensuring compliance with audit requirements.
- Error Handling & Notifications – If a file transfer fails, TN can trigger automated alerts, retries, or alternative routing mechanisms, ensuring business continuity.
- Seamless Integration – TN integrates with other webMethods components like Integration Server (IS), MFT (Managed File Transfer), and Business Process Management (BPM) for end-to-end automation.
By leveraging webMethods TN for SFTP file delivery, organizations can ensure secure, automated, and efficient B2B file transfers, reducing operational overhead and improving partner collaboration.
SFTP Server setup
As we need to deliver the file using the SFTP protocol, an SFTP server is required for this demo. If you already have an SFTP server, you can skip this step. Otherwise, follow the steps below to set up an SFTP server.
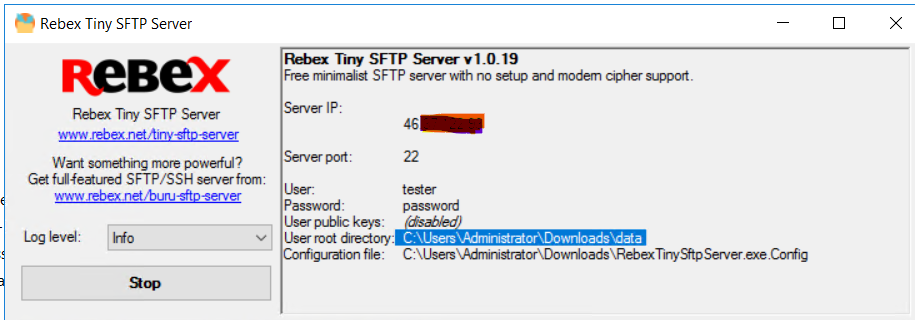
- Navigate to rebex.net and download the tiny SFTP server.
- Unzip the file to extract the application. Run the application and start the server. Once the server is running, you will see the host, port, and credentials.
SFTP Configuration in Integration Server
As we will be delivering file using SFTP protocol, we need to create the SFTP server alias and SFTP user alias and the connection we will be configuring as delivery method for the partner in MWS.
This configuration is already covered in one of the articles. Click here and refer to the “SFTP Configuration in Integration Server” section of the article, then return here once you’re done.
Partner profile creation in MWS
In webMethods Trading Networks (TN), a partner profile is required to process any transaction because it defines the identity, roles, and processing rules for a trading partner. Here’s why it is essential in short:
- A partner profile contains unique identifiers such as DUNS, External ID, or custom attributes to recognize and differentiate partners.
- The profile stores security credentials, such as user authentication details, certificates, and encryption keys for secure communication.
- The partner profile ensures each partner’s specific processing needs are met.
- TN logs all transactions under the corresponding partner profile, making it easier to track, troubleshoot, and audit transactions.
We need to create two partner profile , one we will be using as a sender profile and another we will be using as a receiver profile.
Steps to create the profile :
- Log in to MWS and navigate to:
Administration → Integration → B2B → Partner Administration → Partner Profiles. - Click on “Add Profile”.
- In the “Corporation Name” field, enter a name for the partner profile (e.g., HarmoniGate (Sender)).
Go to the “External ID” tab, click on “Add ID”, select Type: DUNS, and provide a unique numeric value.
- There are other sections available that you can explore, which can help the support team. However, for now, we will focus on the “Delivery Settings” tab, where we specify how the document will be delivered.
Navigate to “Delivery Settings”, click on “Add Delivery Method”, and configure the following:
- Delivery Method: Select Primary SFTP.
- SFTP User Alias: Provide the user alias created in the previous step.
- Location: Enter
/to drop the file into the root directory.
- Follow the same approach to create another partner profile for the receiver. You can skip the Delivery Settings configuration for the sender profile, but it is required for the receiver profile.
Create document type in MWS
In webMethods Trading Networks (TN), a document type is essential for processing transactions because it enables TN to recognize, validate, and route business documents correctly. Here’s why document type creation is important:
- TN needs to identify incoming documents to determine how they should be processed.
- The document type is created with unique attributes (e.g., sender, receiver, document structure, and content-based identifiers) to differentiate various transaction types.
- N can validate document structure (e.g., EDI, XML, flat files) to ensure compliance with partner agreements and business requirements.
- Each document processed in TN is logged under its specific document type, providing visibility into transactions for monitoring, auditing, and troubleshooting.
- sers can easily search for transactions based on document type, sender, receiver, or status.
Sample XML document :
<?xml version="1.0" encoding="UTF-8"?>
<Employees>
	<TN_Params>
		<SenderID>1234</SenderID>
		<ReceiverID>0987</ReceiverID>
	</TN_Params>
    <Employee>
        <ID>101</ID>
        <Name>John Doe</Name>
        <Department>IT</Department>
        <Position>Software Engineer</Position>
        <Salary>75000</Salary>
    </Employee>
</Employees>
If you look at the structure, it contains the Sender ID and Receiver ID in the XML, which correspond to the DUNS numbers of the partners. These identifiers are used by Trading Networks (TN) to recognize the document when it is received.
Steps to create the document type :
- Login to MWS and navigate to :
Administration → Integration → B2B → DocumentTypes Administration → Document Types. - Click on the ‘Add Document Types’ button and select XML.
- Give the document type a name and change the status to Enabled.
- Save the XML file shown above to your file system and upload it in the Identify section.
- On the right-hand side, locate the Root Tag option and select ‘Employees’ as the root tag.
- Navigate to the Extract tab and click on the ‘Add’ button on the right-hand side.
- In the Query section, enter:
'/Employees[0]/TN_Params[0]/SenderID[0]'- In the Name field, select ‘SenderID’, then click OK.
- Repeat the above step for ReceiverID using the query:
'/Employees[0]/TN_Params[0]/ReceiverID[0]'- In the Name field, select ‘ReceiverID’, then click OK.
- Once both fields are extracted, click the ‘Save and Close’ button at the bottom of the screen.
Create processing rule in MWS
A Processing Rule in webMethods My webMethods Server (MWS) is a rule-based mechanism used in Trading Networks (TN) to determine how incoming business documents (like EDI, XML, or Flat Files) should be processed. It defines the conditions and actions that TN should take when a document is received.
Steps to create processing rule :
- Login to MWS and navigate to :
Administration → Integration → B2B → ProcessingRules - Select the first rule and click on the ‘Add Processing Rule’ button.
- Choose the ‘Above’ option to create the new processing rule at ordinal ‘0’.
- The ordinal number defines the execution priority of the rule, determining the order in which rules are evaluated when a document is received.
- Navigate to the Criteria section and configure each setting as shown in the screenshot below.

- Go to the Action tab and configure the delivery mechanism as per the provided screenshot.
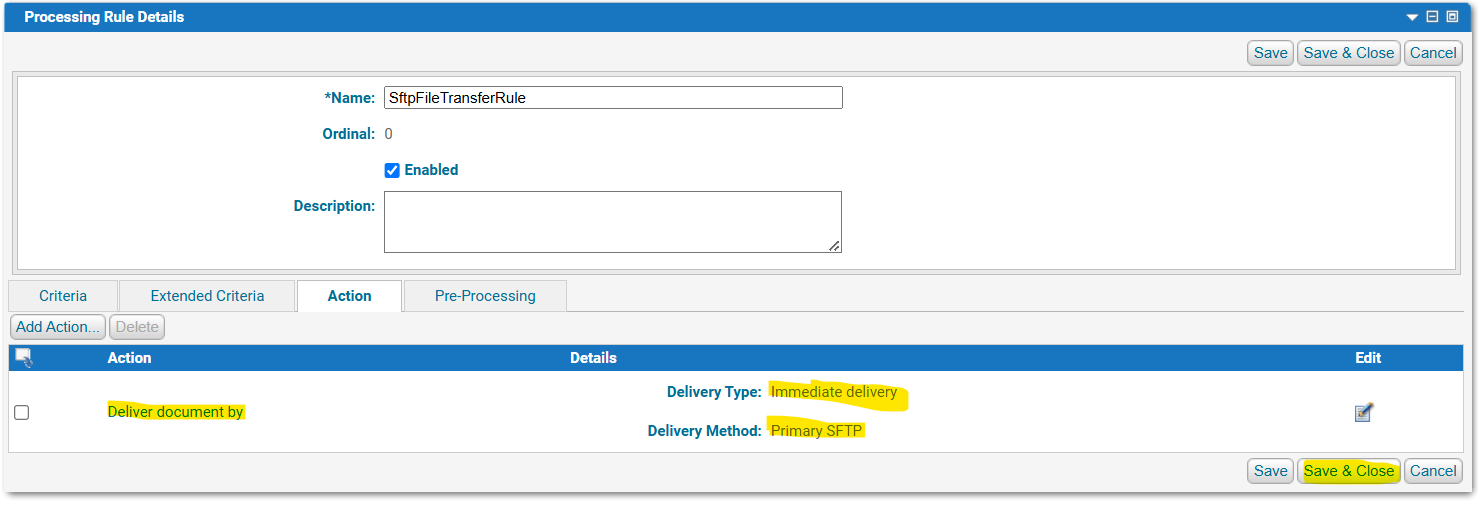
- Click ‘Save and Close’ to finalize the rule.
Submit file to TN from MWS
Hope you have saved the xml file from ‘Sample XML document :’ section of this article, same document we will be transferring via TN to SFTP server.
- Login to MWS and navigate to :
Administration → Integration → B2B Settings → Submit Documents - Once you landed on the submit document page , upload the file from your system.
- Once file is submitted navigate to
Monitoring→ Integration → B2B→ Transactions - On the Transaction page, search for today’s transactions. You should see that the transaction has been successfully completed. Additionally, if you verify on the SFTP server, you will find that the file has been transferred successfully.


Submit file to TN from using flow service
Create a Flow Service, and in the Input section, add a variable:
- Name:
xmlString - Type:
String
- Name:
- Inside the Flow Service, invoke
pub.xml:xmlStringToXMLNodeto convert the XML string into an XML node. - Invoke
wm.tn:receiveand map the XML node to thenodeinput. - (Optional) Populate the following fields to avoid TN scanning for them:
TN_parms/DoctypeName→ Set this to the exact document name.TN_parms/processingRuleName→ Set this to the exact processing rule name.- Ensure that the names are case-sensitive and match exactly.
- Now you can run the service with the xml string as input and you will be able to see the transaction in MWS and the file in the SFTP server.